Sarah Miller Tech

  • Home
  • Webinars
  • Blog
  • Shop
    • Shop Resources
    • eBooks
    • Shop T-Shirts
  • Free
blog image 2.png

Grab my FREE guide!

Stop neglecting social studies with these easy to use strategies! Teach social studies, even when you don’t have time!

DOWNLOAD

Creating a Jeopardy Game in Google Slides™️

July 14, 2020 by Sarah Miller
 
Blog Thumbnails .png
 

As you know, jeopardy-style games can be a really fun way to review content with your students. They are a great test prep activity! You might be really excited about the idea of creating your very own game in Google slides or maybe you’re a little worried about it – either way, I’m going to share some simple steps with you on how to create your very own jeopardy-style game on Google Slides! I will

have linked in the description below a step-by-step guide, so you can view that after you watch the video. There will also be a link to a generic template, a planning workbook, and a review game that you can purchase that is ready to go (if you’re 5th grade social studies)!

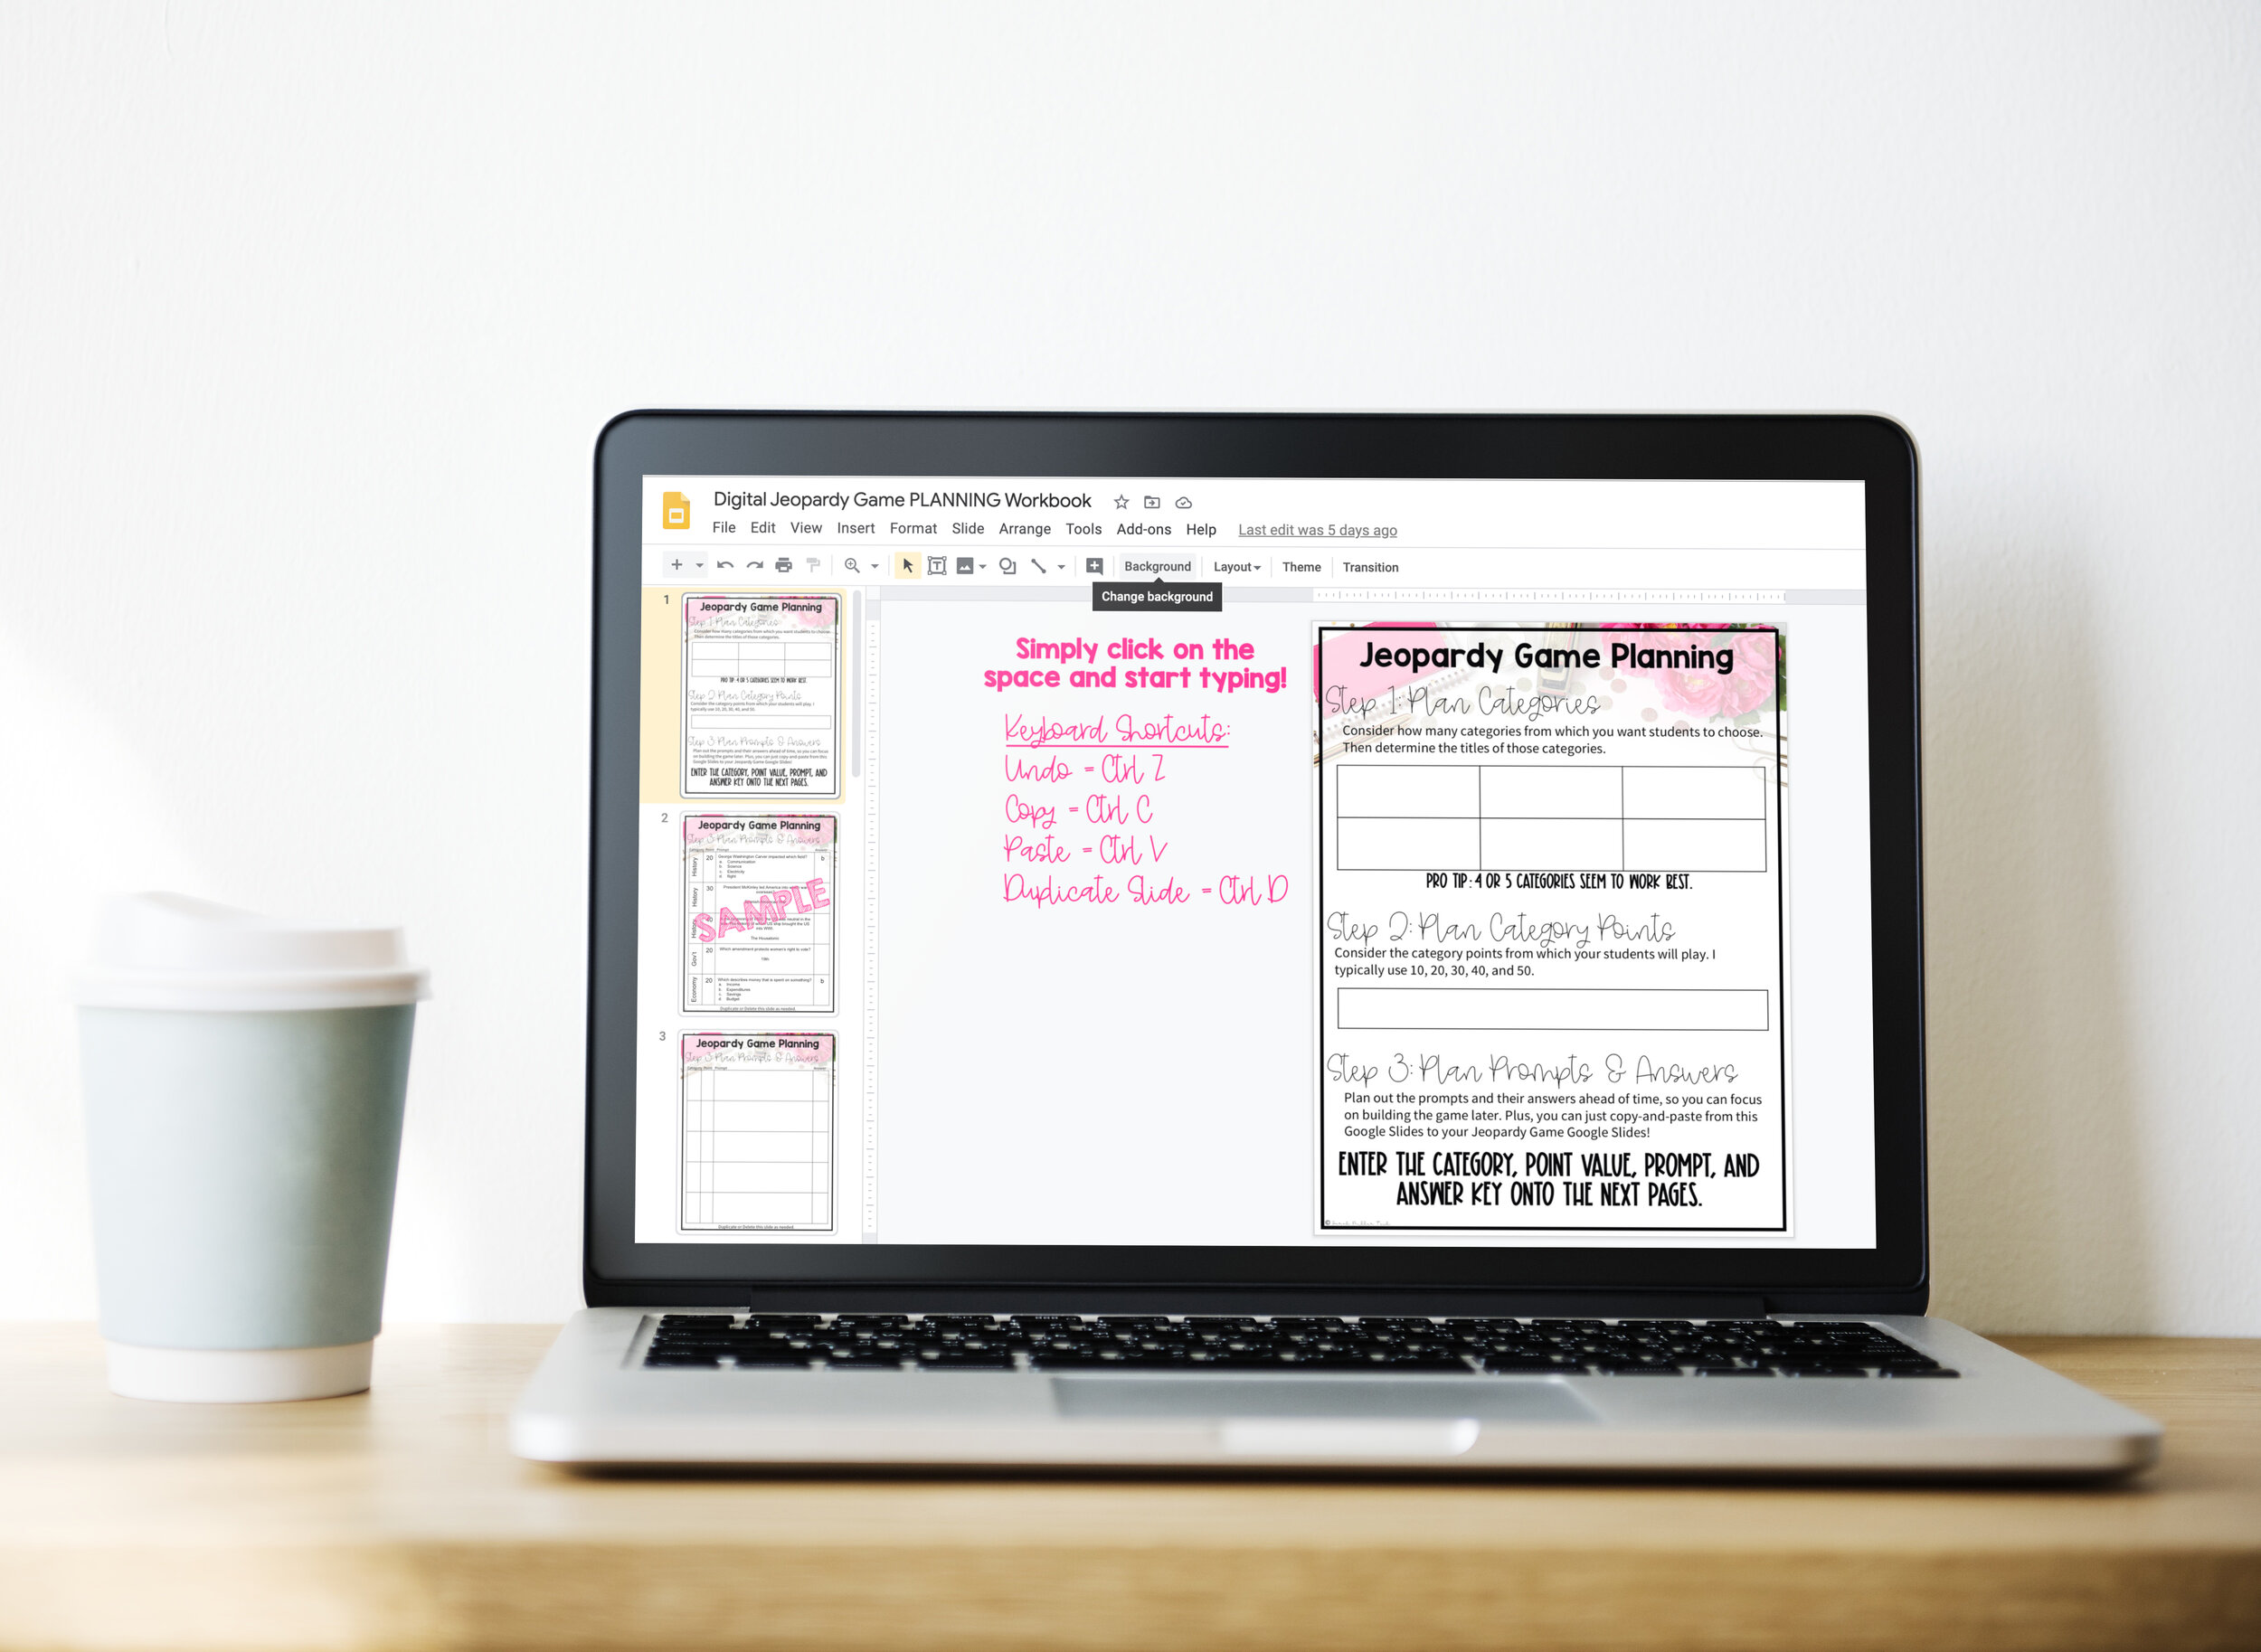
Before we jump right into the techy stuff, I recommend that you go ahead and do some planning before you start creating. You’ll need to know how many categories you want and how many points. Plus, you’ll want to have your prompts and answer key on hand. To help you out with the planning process, I created a free digital planning workbook that’s linked below. It’ll make this process super easy because you can just copy and paste your prompts from there into your new game!

3027250 Simple MacBook Pro on table.jpg

Digital Planning Workbook

in Google Slides™️


Completed Version

5th Grade Social Studies Example

Game Board Slide
Prompt Slide

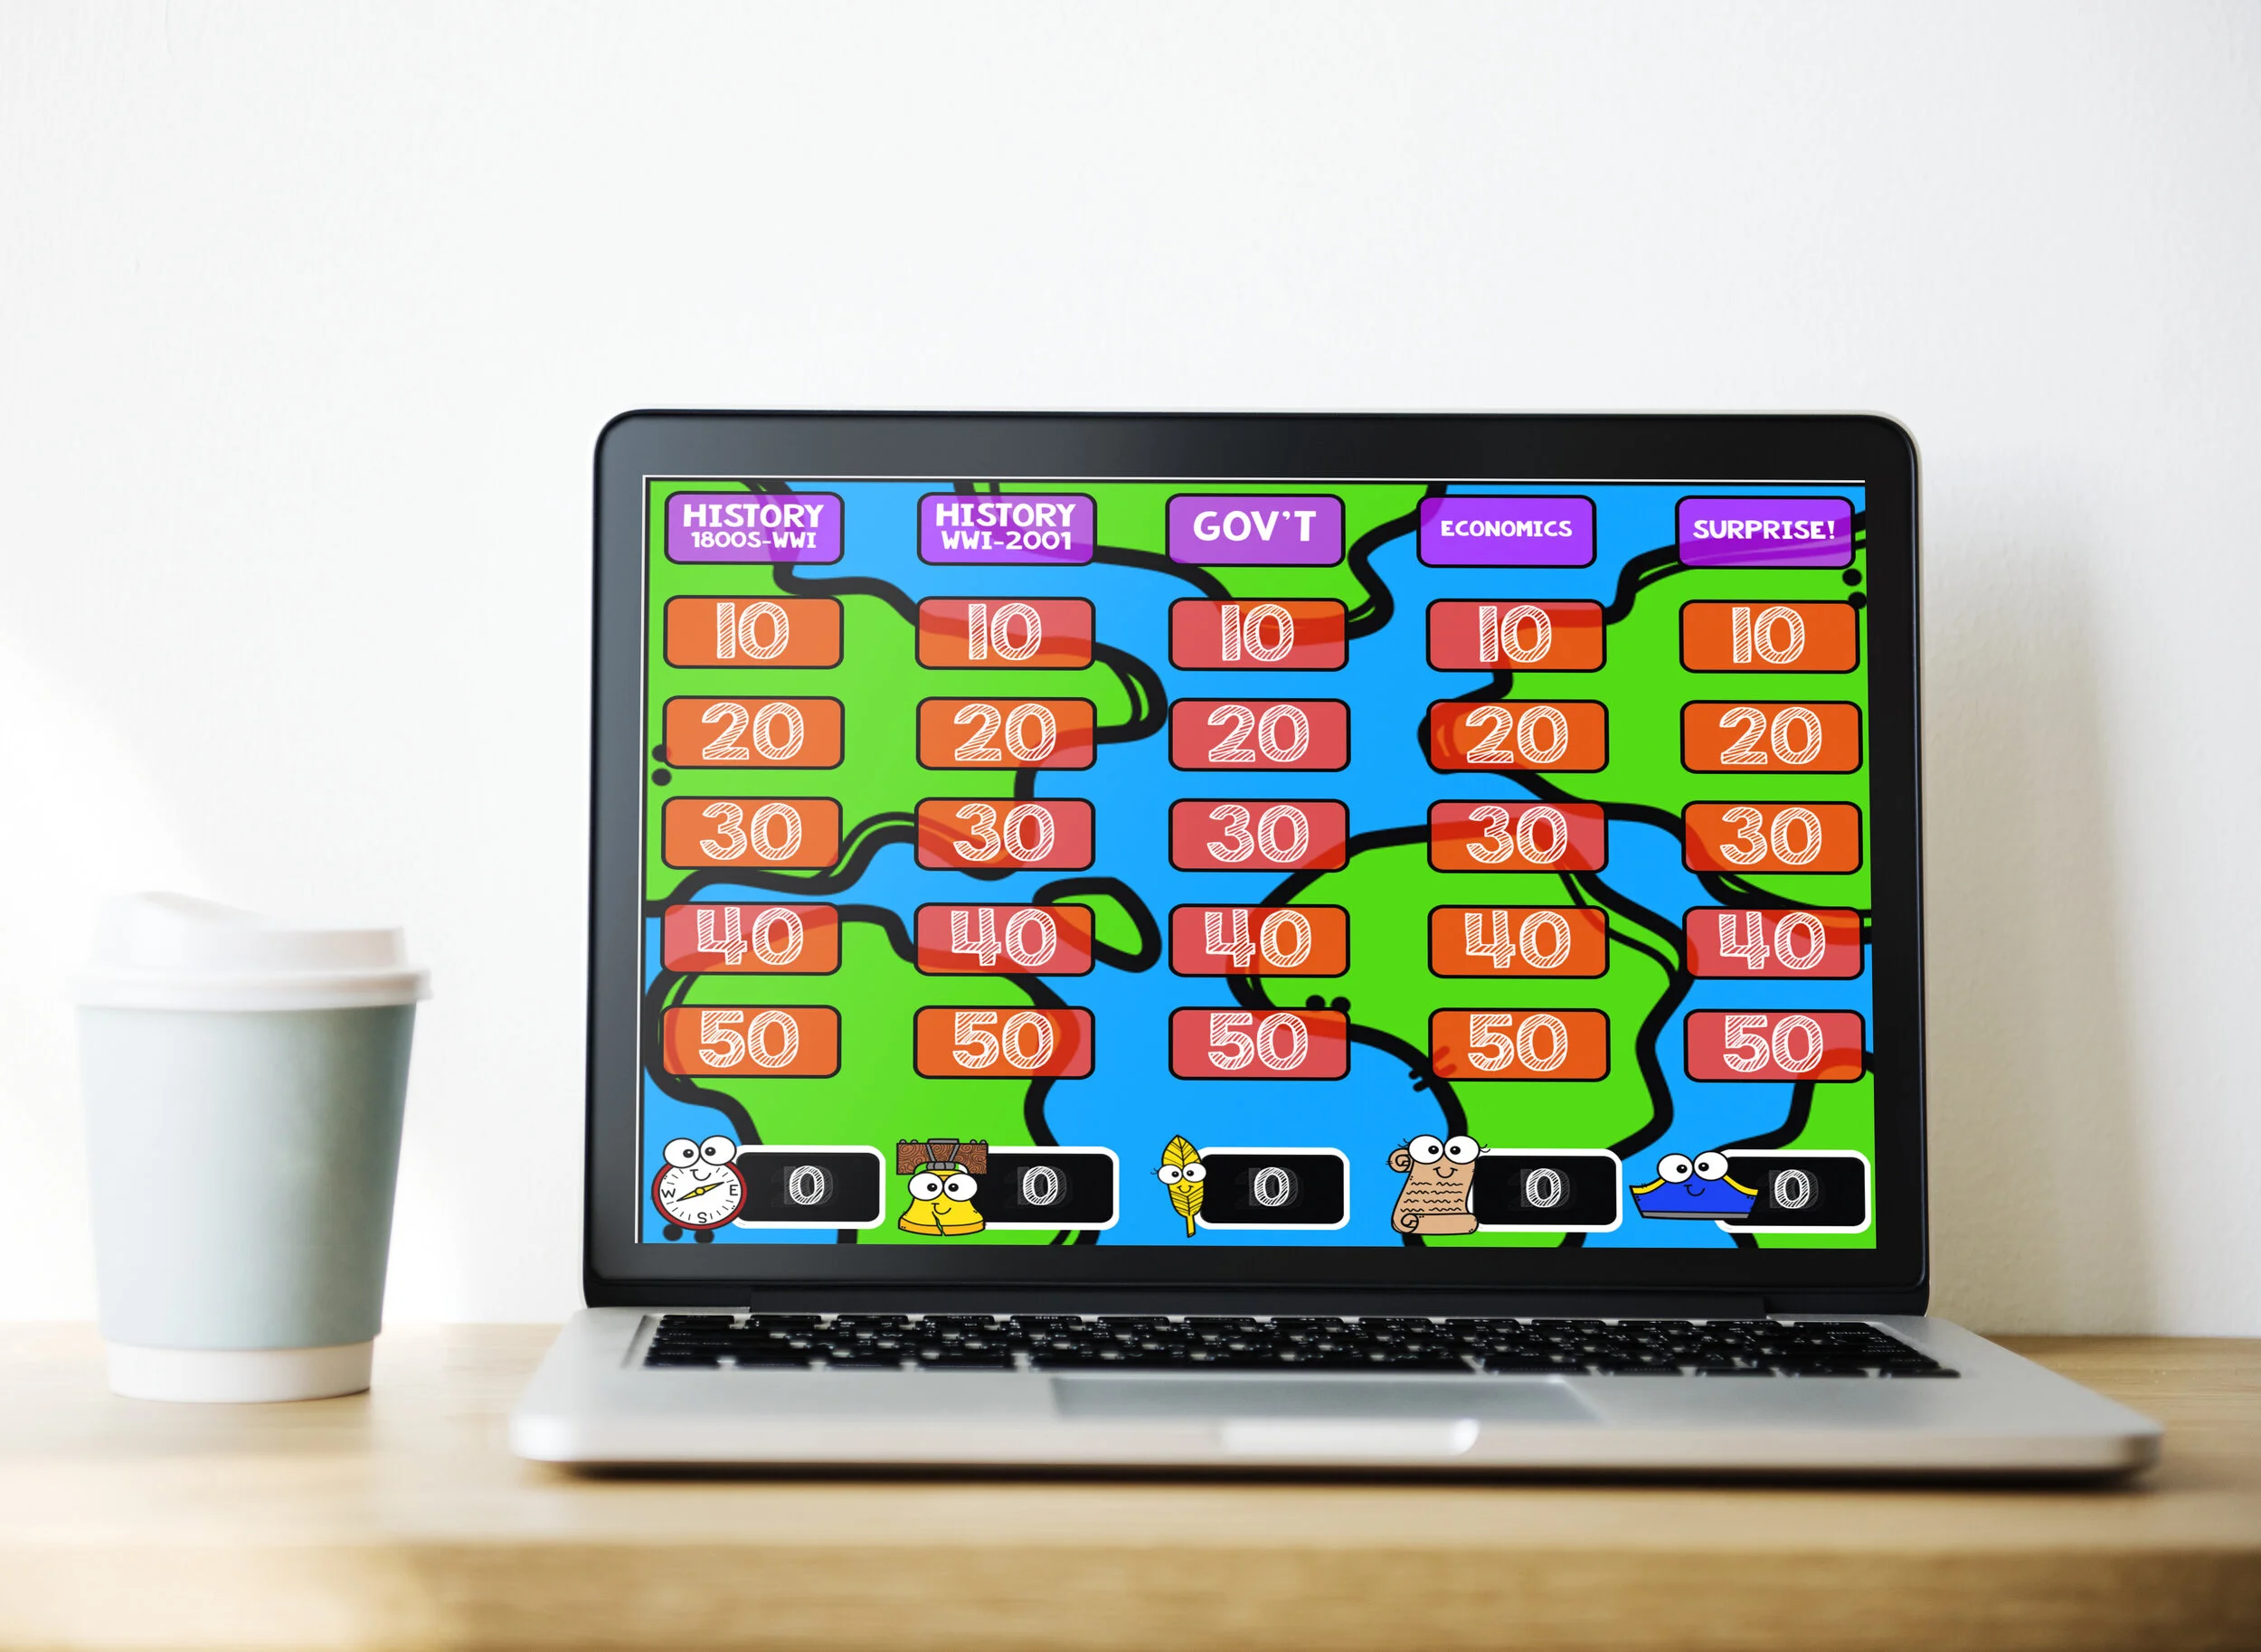
Let’s start with the end goal! The Jeopardy-Style review game includes a Game Board slide that is linked to prompts (Categories), which is linked to an answer slide. Consider how many categories and prompts you’d like to use. To do this, consider the depth of the content you are covering. For example, if you have a light or shorter unit, you may want to consider less prompts. So, instead of having 4 categories that range from 10 points to 50 points, you might have 3 categories that range from 10 points to 30 points.


Game Board Slide

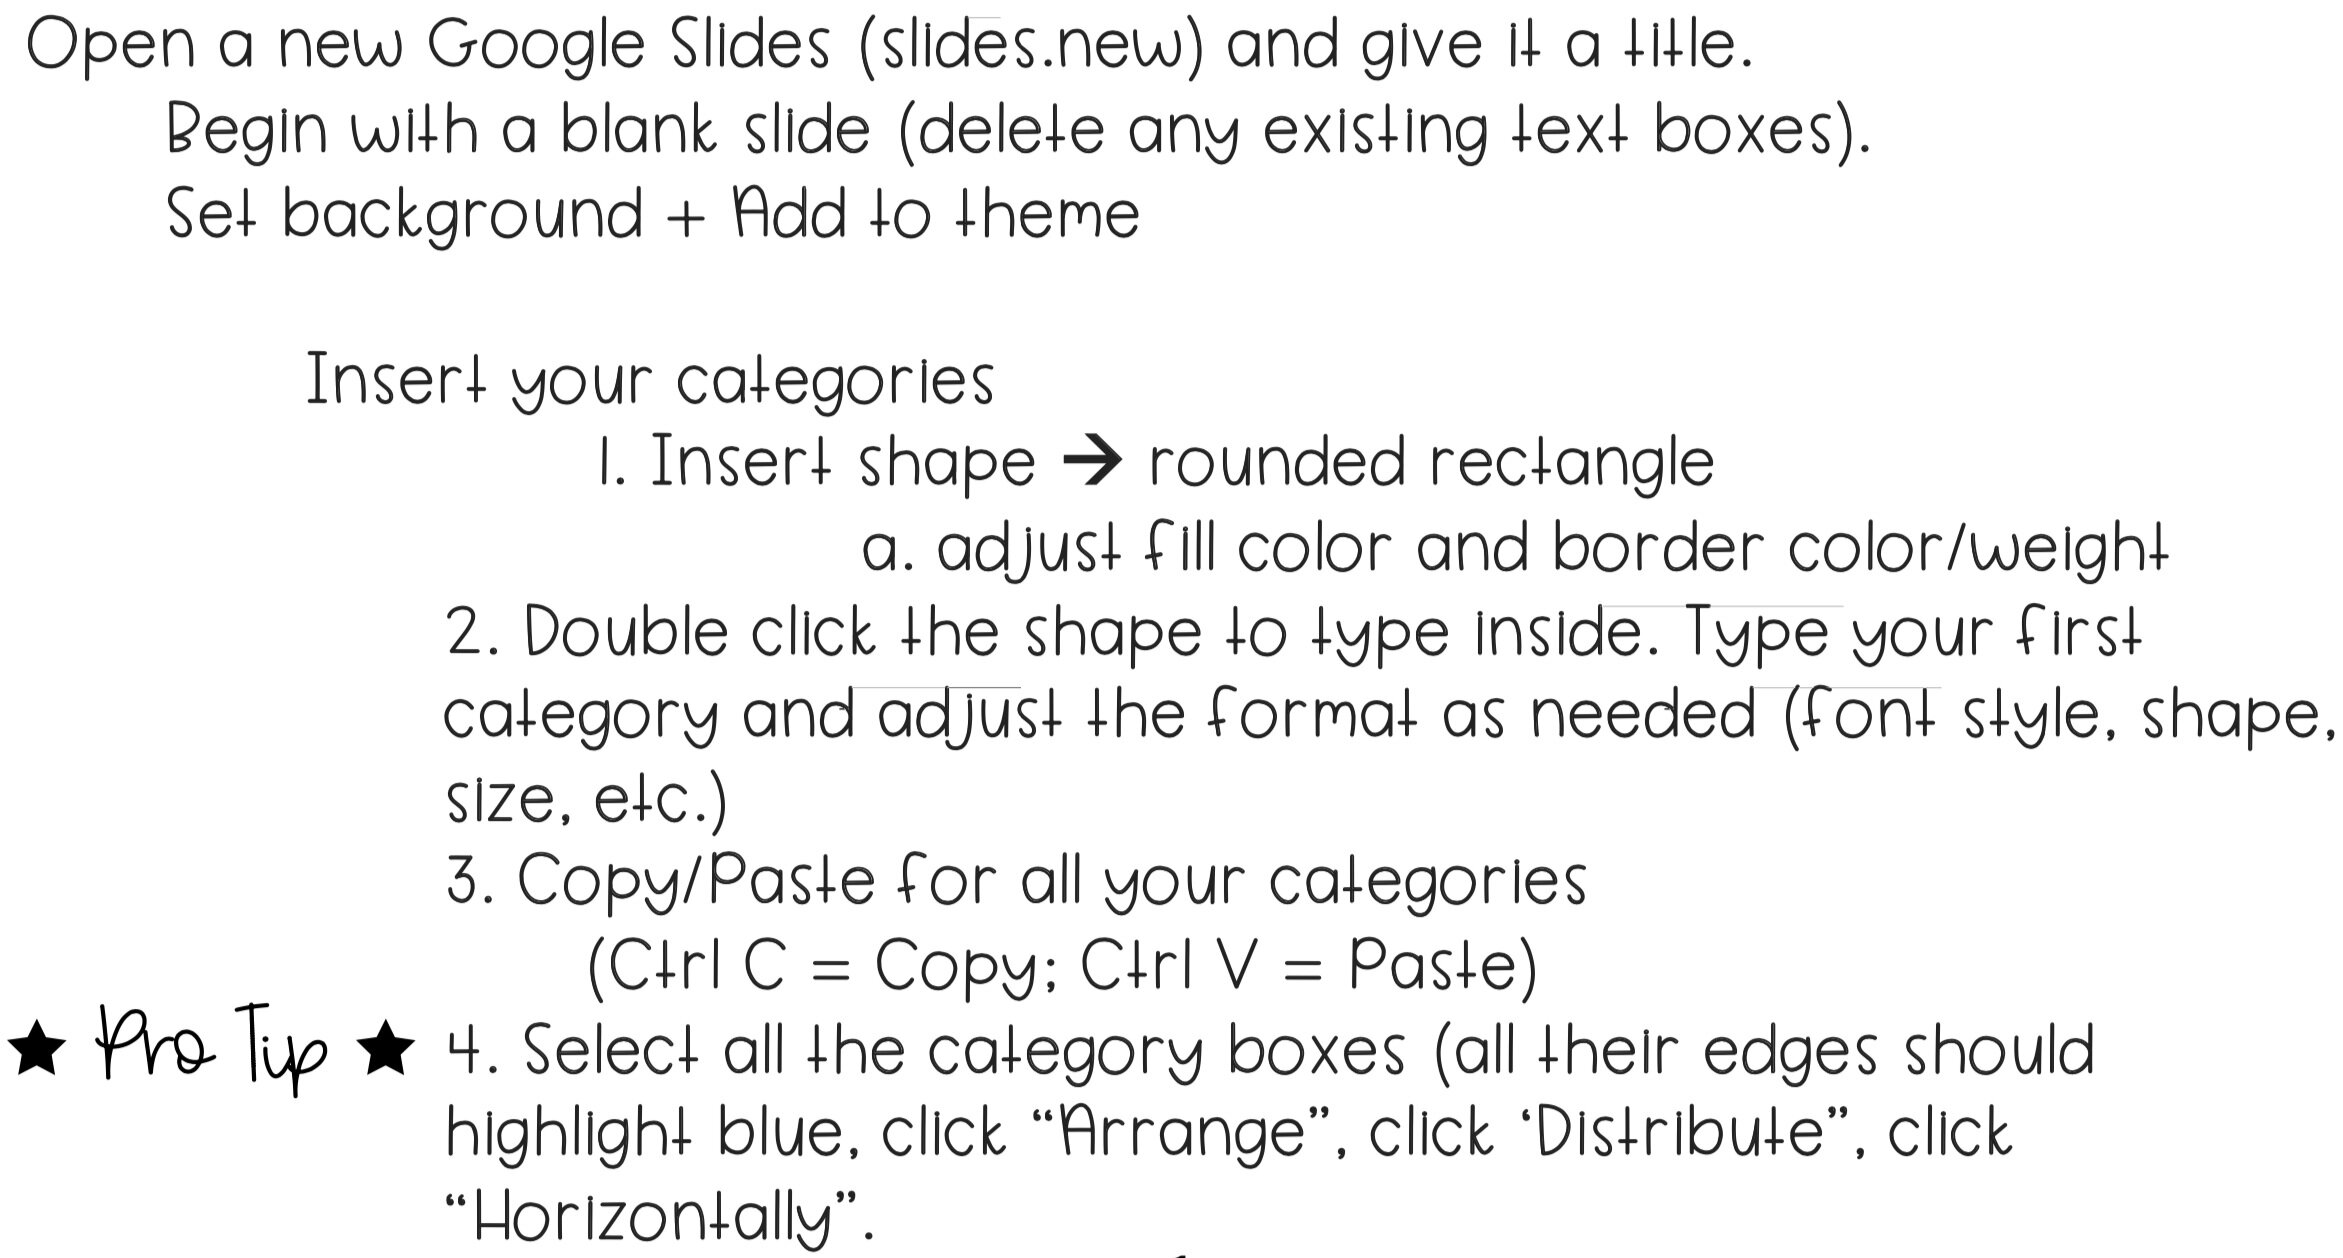
Steps+1-4+How+to+Guide
Add point values under categories
 
Digital Template for Teachers

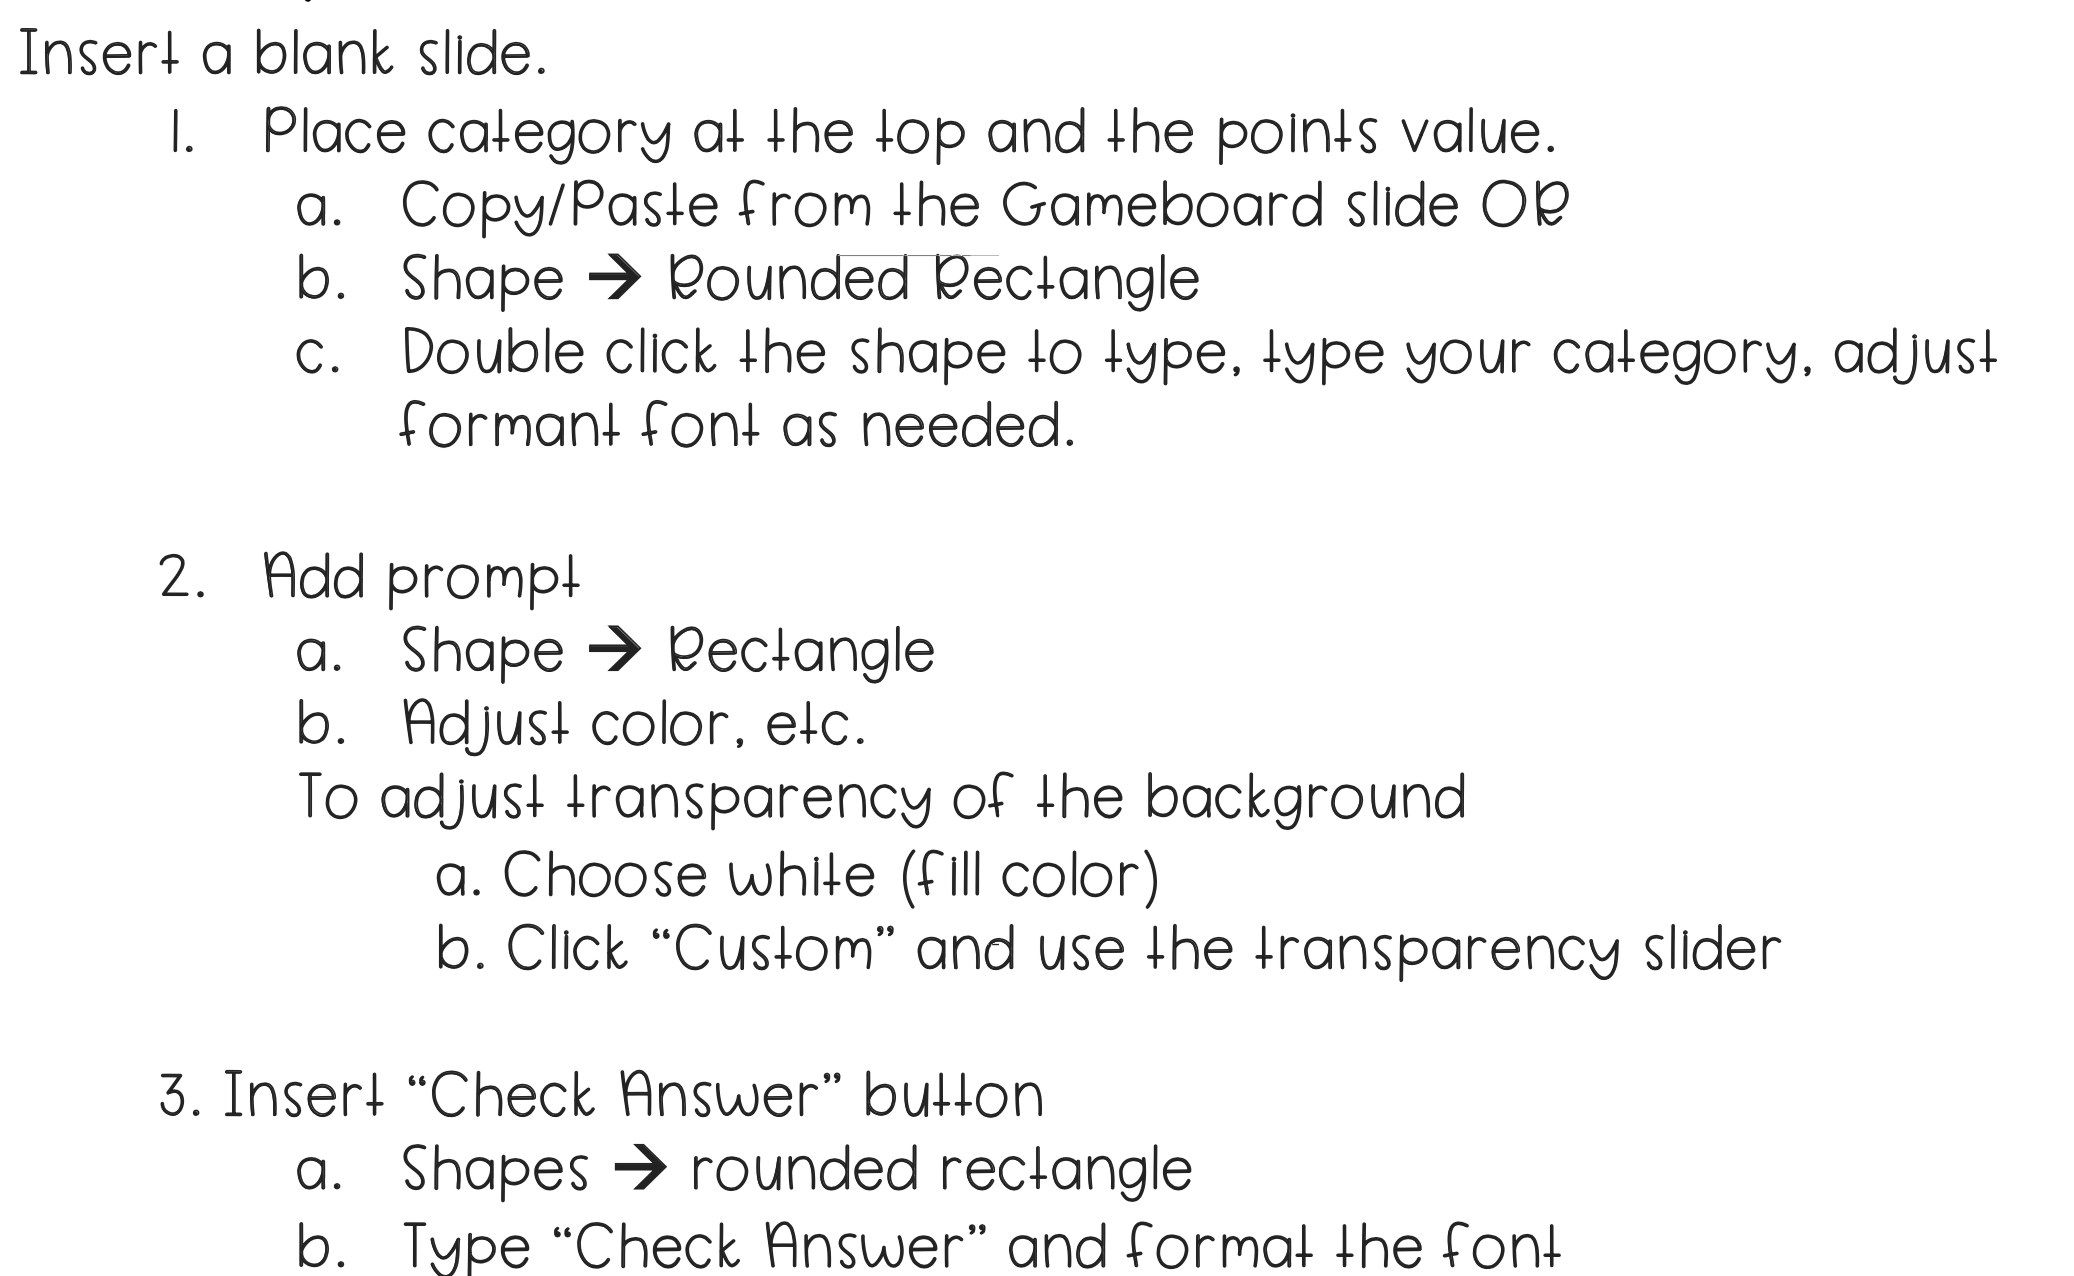
Prompt Slide

Printable Guide for Teachers
Digital Template for Teachers

Answer Slide

Answer Slide Directions
3027250 Simple MacBook Pro on table (3).jpg

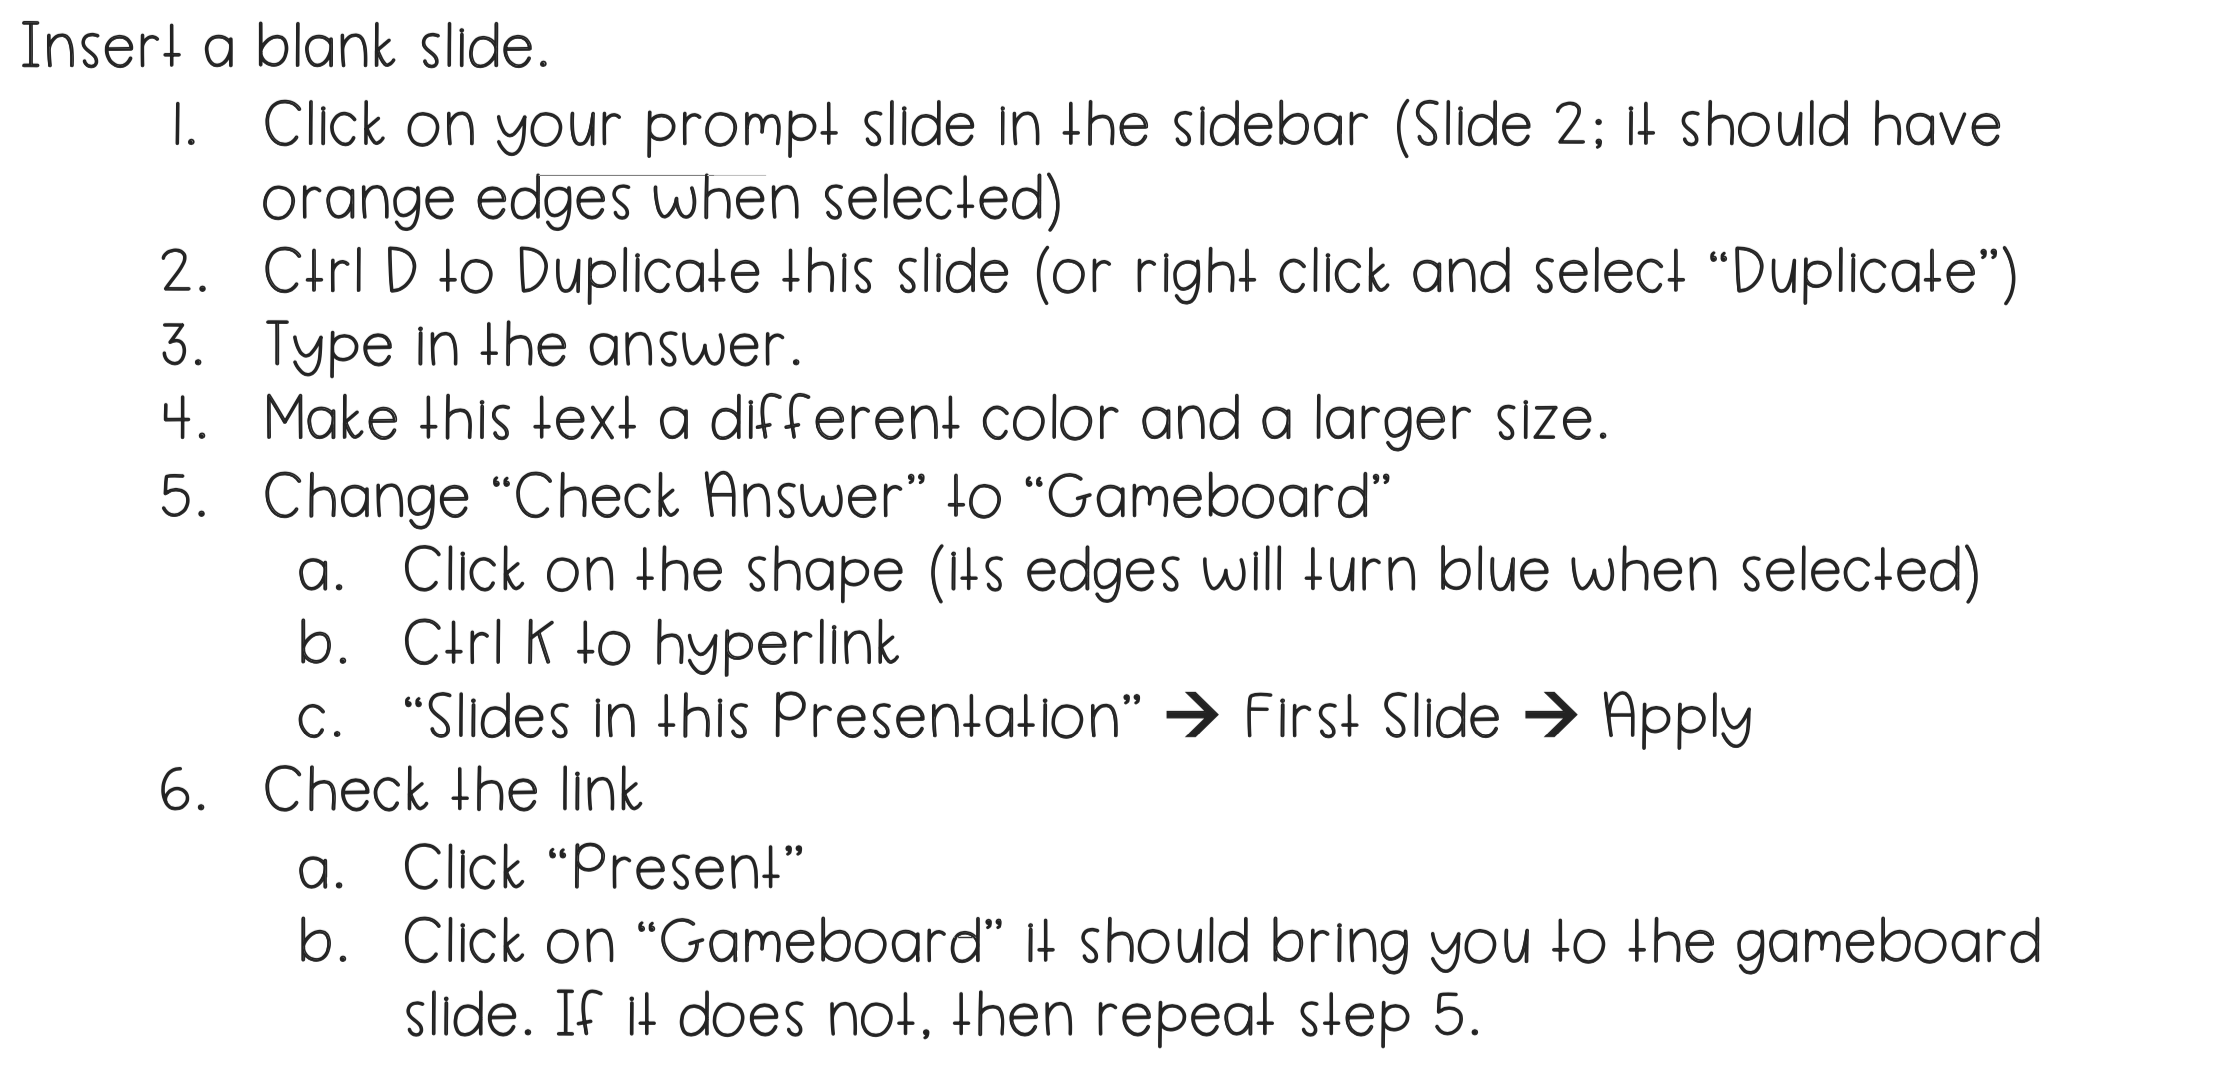
Linking the Prompt Slide to the Answer Slide

Linking Directions

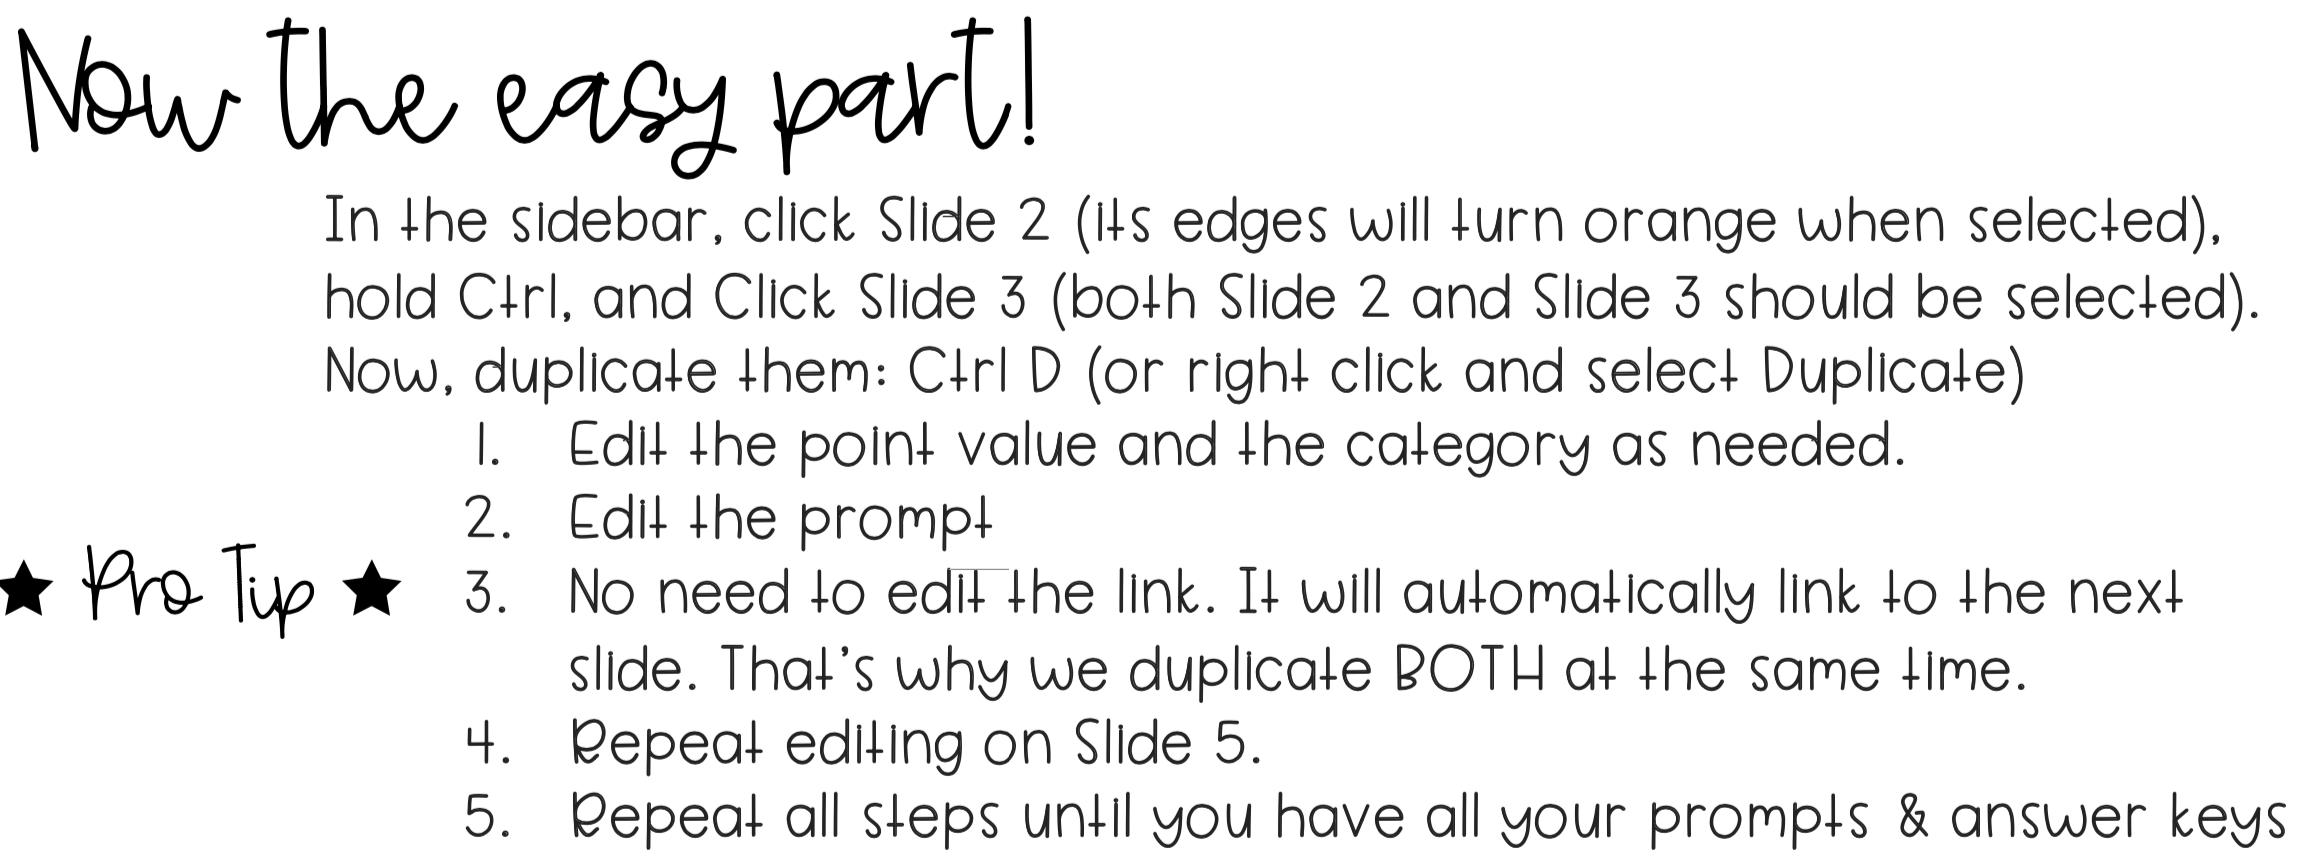
The Rest of the Prompt Slides

Duplicate Prompt Slides Directions

Linking from the Game Board

Linking Directions

blog image 5.png
Grab a free generic game template

Screen Shot 2020-05-09 at 2.28.28 PM.png
July 14, 2020 /Sarah Miller
Google, google classroom, digital activities, coaching
blog image 2.png

Grab my FREE guide!

Stop neglecting social studies with these easy to use strategies! Teach social studies, even when you don’t have time!

DOWNLOAD

Coaching Tech PD: Using Digital Templates and Printable Guides

June 18, 2020 by Sarah Miller
 
Blog Thumbnails .png
 

The “Why” Behind Using Templates

As you know, digital activities and virtual learning are becoming more and more mainstream. Maybe you’re loving the idea of coaching your teachers on digital activities or maybe you’re still not comfortable yet – either way, today I’m going to share some advice with you on how to set up your professional development in a way that will help you reach all of your teachers. I will have linked in the description below a step-by-step guide, so you can print that out after you watch the video. There will also be a link to sample templates and guides to get you started!

Using templates with my teachers was simply a game-changer for me. They truly allowed me to zero in and focus on my core objectives in a way that was effective for my “not-so-techy” teachers and my “techy” teachers.For example, if you’re trying to teach how to create a sorting activity in Google Slides, you can give your teachers a template so they can jump right into the “sorting part” instead of spending so much time on the things that have to be done to lead up to it (like backgrounds, formatting fonts, etc.). While those skills are important, they tend to make these learning days frustrating to those who are not comfortable with the technology. Before I started with the templates, I felt my teachers who were uncomfortable with the technology were getting behind and feeling overwhelmed. Once teachers feel like they’re behind and overwhelmed, it can be difficult to recover. And that can, unfortunately, set the tone for your PL.   

Providing templates and using a “breakout”-style PD helped to overcome those challenges, while still accommodating my tech savvy teachers.

We called it a “breakout” style PD because I would give little directions before teachers partnered up and began creating. I would go over my objectives, then show a “goal activity”, give them their printed guides, and let them create. Once they finished and turned in their work, they were dismissed. This was great for my tech savvy teachers! They were much more involved because I was still able to give them little nuggets of information they didn’t know before, but they weren’t “stuck” waiting on everyone to finish. I feel like this also had a positive effect on my “not-so-savvy” teachers. They seemed to be more relaxed because they weren’t rushed, and they didn’t feel like they were “wasting” someone else’s time. Plus, they got me more one-on-one. For us, this strategy was successful! 

Let me show you some examples of the templates and guides we used!


Examples

Upper Grades Example

Screen Shot 2020-05-28 at 9.58.40 AM.png
Screen Shot 2020-05-28 at 10.04.39 AM.png

Let’s start with an 8th grade social studies template. Above is my objective for this particular Tech PD. Now, this is a long list of objectives because we worked our way up to this. Know your teachers! If they, as a group, aren’t ready for this many just pick one or two. See the “Breakout Guidelines”. This was displayed, so teachers could see the keyboard shortcuts.

Printable Teacher Guide

Printable Teacher Guide

Digital Template for Teachers

Digital Template for Teachers

This template has a lot that is already created for teachers for a couple reasons. One, I wanted to expose teachers an interactive lesson that had a variety of activities. Two, I wanted to focus only on my learning objectives. My learning objectives don’t require them to write a whole passage or even copy and paste one, so I did that part for them. They must start by inserting the text placeholders. Also, my learning objectives don’t include finding a background or formatting titles, so I did that for them. I want them to spend their time with me wisely – the last thing I want is to waste their time.

On the slide above, all teachers were required to do is create the items to be sorted and link in a “hint”. The directions for these was located on the printed packet. Switch screen to the “Tasks” Doc.  

With an activity like this, I would typically include a completed version of the activity to the teachers afterwards. I really tried to be aware of what the teachers were teaching at the time and I tried to create activities that reflected that.  

This is just one sample, and it’s pretty complex. Now, let me take you through an example from lower grades.


Lower Grades Example

Printable Guide for Teachers

Printable Guide for Teachers

Digital Template for Teachers

Digital Template for Teachers

Above is a template we used for 2nd and 3rd grade teachers to create their own math and literacy printables. As you can see, this looks very different from our other example because the learning objectives and the needs of the teachers are very different. In both slides of the template, the teachers are given a big head start. They are basically completing the pattern I set up for them using the guide.

This is the guide for teachers to use while they’re working with their template. As you can see, it has every single detail written out. This, honestly, is a TON of work for me. However, it was SO worth it. Teachers were so much more comfortable and engaged when they had these printed guides.


thumbnail.png

Don’t have time to make your own printable guides?

I’ve got you covered!

Click Here!

Tips for Implementation

Using templates in tech PD can be a major step towards meeting the needs of your teachers, no matter where they fall on their technology comfort-level.

Slide1.png

When you’re creating your template and PD, make sure that you have a clear objective in mind. What skills are you really wanting your teachers to be able to do when they leave today?


Your whole template and guide should revolve around those objectives. You can even split up groups with different objectives. Just be clear on what your takeaways are. This is a great way to increase buy-in for your tech resistant teachers and your tech savvy teachers!

The whole point of using templates is so that you can really zero in on your objectives, so make sure that your template takes care of all the “background” work. If you’re teaching how to insert text placeholders for students to type their answers in a Google Slide activity, go ahead and put in a sample passage or prompts to scaffold that learning. You don’t want your teachers wasting 10 of their 30 minutes with you trying to find a background they like or hand typing a passage.

I’ll be honest, when I first started, I did not provide step-by-step guides. I just modeled how to do it, we practiced it, and that was it. I got request after request for printed step-by-step guides. I finally decided to make one, and it was a TON of work. I was like, “no way – this takes waaayyy too long. It’s not worth it.” Until the next PD and I saw the impact it had. These guides were great for those who wanted to keep a hard copy of what they learned for later reference, but it was also what led to a shift towards the “breakout” style tech PD. With the guides, teachers were able to be more independent and work more at their own pace. This was well-received by teachers at all tech comfort-levels.  

Slide4.png

This just means to try to eliminate wasted time searching for clip art. For example, I had 1st grade teachers create an interactive number bonds activity with a farm theme. I provided a folder with farm clip art, so they wouldn’t have to waste time searching on Google for the clip art. Sometimes this isn’t a big issue, but my lower grades were on such a limited time frame for PD. We had a 30-minute block, but by the time everyone gets settled, logged in, etc. we had closer to 20 minutes. I really tried to include everything they’d need, so we could focus on the objective.

Each time your teachers come to a Tech PD, challenge them to use keyboard shortcuts. This will help increase their efficiency. The key to this is to ask them to use a specific shortcut for each activity. This helps them practice it in a relevant setting. For example, the shortcut for “copy and paste” might be more relevant than the shortcut for “print”. When you’re giving your overview of the template, share their “shortcut challenge” and demonstrate how it works.


guide cover.png

Grab your Guide & Free Templates

Grab your Guide!

Screen Shot 2020-05-09 at 2.28.28 PM.png
June 18, 2020 /Sarah Miller
Google, google classroom, digital activities, coaching
blog image 2.png

Grab my FREE guide!

Stop neglecting social studies with these easy to use strategies! Teach social studies, even when you don’t have time!

DOWNLOAD

Distance Learning: Creating Geography Activities in Google Slides™️

May 26, 2020 by Sarah Miller
 
vlog 1.png
 

As you know, we’re teaching in different times. Maybe you’re killing it with this whole distance learning thing, or maybe you’re not – either way, today I’m going to share some advice with you on how to create these digital interactive activities. I’ll leave you with a step-by-step guide, so you can print that out – it’ll be like having me right there by your side!

Slide1.png

Drag and Drop activities can be used in a thousand different ways, and they are really great for geography!

Now, one common problem we face is that students will be dragging everything all over the place, not just the circle, and the slide gets all messed up. You have a couple options to solve this problem. 

1: Create all your non-movable pieces in PowerPoint, then use them in Slides.

This is my preference: Create your backgrounds (directions, map, etc. basically anything that needs to stay put) in PowerPoint, export them as images, then set them as a background in Slides. 

2: Create everything in Slides, but your non-movable pieces in Master Slide view.

If you’re like, “who the heck has time for PowerPoint AND Google Slides?!” Then this option is for you! You can create your backgrounds (all the non-movable pieces in the Master Slide view.

NEED A STEP-BY-STEP GUIDE? SCROLL TO THE BOTTOM OF THE POST!

Drag and Drop: Circle (or Shapes)

Drag and Drop: Circle (or Shapes)

Drag and Drop: Labels

Drag and Drop: Labels

Master Slide View in Google Slides

Master Slide View in Google Slides

Fill in the Blank using the “drag and drop” method.

Fill in the Blank using the “drag and drop” method.

Types of Activities you can create with Drag and Drop:

  • Drag the circle to _____. (See image above.)

  • Highlight (insert a semi transparent shape to act as a highlighter)

  • Match the labels to the correct location (see image above).

  • Fill in the Blank

Vlog 1 Icon Headers.1.png

Students definitely enjoy these types of slides much more than the others. However, I have found that I get much better responses if I provide them a template. I think we’ve all been there! Give them a blank slide and they spend a thousand years on their backgrounds and fonts. No more! I have a few ideas that will help you with this, and I go into a deep dive in a different blog post. CLICK HERE TO SEE THAT BLOG POST!

This time for your non-movable background pieces, you are going to have a table instead of a map or text. I highly recommend you either use the Master Slide or create in PPt. Students can get this table so messed up that it’ll practically be beyond repair! You can put whatever you want in the table for students to find. I like to have one slide dedicated to MAP images, and one slide dedicated to REAL images of the places. Students usually enjoy researching real images of new places!

Research: Students insert images to their slides

Research: Students insert images to their slides

Research: Students insert text into their slides

Research: Students insert text into their slides

These activities are perfect for distance learning and for blended classrooms! The possibilities are really endless here! I have created similar activities for science, social studies, and language arts. One drawback, though, with these Google Slides is that grading can be cumbersome because you have to open each student’s slide and scroll around. One tip I have for you is either grade directly in the Google Classroom portal so you can use the arrows to scroll from one student’s work to the next or to use Alice Keeler’s Drive 20 extension. I’ll have it linked below. Basically, you click on her extension and it will open up to 20 files at once. You’ll have to wait for them to load, but then you can switch from one student’s work to the next by the tabs at the top of your browser window. Another tip is to only grade this for completion, and then have students complete a Google Form activity with the same or similar skills and take that for a grade to show mastery


Thumbnails .png

Grab your Step-by-Step Guide

Grab your Guide now

Slide1.png

Africa Geography

Activity in Google Slides™️

Shop Now!

I want to hear from you!

What are YOUR go-to activities for geography? Let me know! Tag or message me on Instagram!

IMG_0170.JPG

Instagram

@SarahMillerTech

May 26, 2020 /Sarah Miller
social studies, geography, distance learning, Google, google classroom
blog image 2.png

Grab my FREE guide!

Stop neglecting social studies with these easy to use strategies! Teach social studies, even when you don’t have time!

DOWNLOAD

6 Tips to Get High Quality Work from Students during Digital Activities

May 25, 2020 by Sarah Miller
 
Vlog 2 Thumbnails .png
 

The “Why” Behind Using Templates

As you know, digital activities are becoming more and more mainstream. Maybe you’re loving the digital activities or maybe you’re still not comfortable yet – either way, today I’m going to share some advice with you on how to set up your digital activities so that you get quality work back from your students. I’ll leave you with a printable guide and access to sample templates. Find that at the bottom of the blog post!

Using templates with my students was simply a game-changer for me. Even though I loved using technology in the classroom, I avoided the “create a presentation” type of assignment like the plague. It seemed like every time we did an assignment like that, my students would spend 3 days or even a week, and then turn in nothing of quality. They’d have all kinds of crazy background images and wacky fonts, but their content was really lacking. Then, I had the crazy idea to give them a template. In Google Classroom, I can give them a pre-made template in Google Slides and assign it in a way that each student gets their own copy to edit. Life-changing Moment. 

There are so many advantages of using a template. First, it gives structure to the assignment. You are able to set very clear expectations on each and every slide RIGHT where they’re looking (as opposed to on a paper with a checklist). Second, it allows you to truly differentiate. You can send different templates to specific students. Also, templates allow you to take advantage of using visual clues which helps students know where to place images and text on the same slide in a way that makes sense to a viewer.

Personally, I used templates with 7th graders. During my instructional technology specialist days, I’ve seen this work for grades ranging from 2nd all the way up through the middle grades. I’ll share some examples of different grade level templates with you.

Tips for Implementing Digital Templates

I have 6 tips for implementing digital templates with your students. These tips will help you get high quality work back from your students as they work in digital assignments.

Slide1.png

When you’re creating your assignment, make sure that you have a clear objective in mind. Are students exploring? Are they applying knowledge? Or are they being assessed? Once you have determined your objective, be sure to design your template in a way that best fits your objective. Avoid assigning the template just so you can say you’re using technology! 

Also, when you’re creating your template, think about expectations and make those clear on each slide. For my students, I typically included the title of the slide and directions. Students should not have questions about WHAT to do. They should only have questions about HOW to do it.

Slide2.png

You’ll want to make sure you give a thorough overview of the assignment and your expectations before you allow students to even login to their devices. So, after you’ve created and assigned the template, show your students how to use the template. For example, show them to move the red text lower so they have room to type without deleting it. I can’t tell you how many times I’ve had a student say they don’t know what to do because they deleted all the red text FIRST, before completing it. Model moving the text and emphasize the importance of keeping that text there until the end.

Slide3.png

Each time your students work on a digital assignment, challenge them to use keyboard shortcuts. This will help increase their efficiency. The key to this is to ask them to use a specific shortcut for each assignment. This helps them practice it in a relevant setting. For example, the shortcut for “copy and paste” might be more relevant than the shortcut for “print”. Have a running list in your classroom, so you can add new shortcuts throughout the year. When you’re giving your overview of the assignment, share their “shortcut challenge” and demonstrate how it works. If you are unfamiliar with keyboard shortcut options, simply do a Google Search of “Chrome keyboard shortcuts” and a list will pop up for you.

Slide4.png

From experience, it takes FOREVER for some students to decide on their backgrounds and fonts (we called this “decorating” in my classroom) To keep them on track, I’d set a timer at the very beginning. When the timer runs out, you should be working on the content of your assignment – no more decorating. Remind students that they need to choose a theme first because if they do it last, it might affect the formatting – meaning it might move their images and text around and they’ll have to go back and fix it. For my 7th graders, I would give them between 5 and 10 minutes, depending on the group of students. Use your judgement there and you can make adjustments for the next time. Now, they don’t need to spend the entire 5 to 10 minutes decorating- they can move on when they’re ready.

Slide5.png

Just like any assignment, some students need help moving forward. I noticed that some of my students would get fixated on choosing that “perfect” picture for their presentation. Look out for this, take note, and be patient with them. Sometimes having too many options can be overwhelming. After class (or during if you’re limited on time), go into the student’s assignment and insert 3 picture options. Ask them to choose 1 from those they like and delete the other 2. You can also do this with prompt responses, too. If an open-ended question is too overwhelming, offer support via feedback in their assignment. Then the next day before students open their assignments, tell them some might have a message from you. They’ll need to check for that first before moving on.

Slide6.png

Consistency always makes things easier! I know that not every assignment will be the same, so the templates should not be the same either. However, being consistent with certain things will make life easier. For example, keep all the text that should be deleted the same color. I chose red. So in every template we ever used, red text indicates text that should be deleted. Also, for every template, my feedback or notes were always in purple text. If a student saw purple text in the margins, it was likely a note from me.

guide cover.png

Grab your Guide & Free Templates

Grab your Guide Now!


CIRCLE F REVISED.4 copy.png
 
Blush Pink Photo Mother's Day Instagram Post.png
May 25, 2020 /Sarah Miller
Google, google classroom, digital activities
blog image 2.png

Grab my FREE guide!

Stop neglecting social studies with these easy to use strategies! Teach social studies, even when you don’t have time!

DOWNLOAD

Tech for Test Prep

January 07, 2020 by Sarah Miller

Testing Season is fast-approaching! Let technology do some of the work for you. I have several tips for you to help maximize your test prep while using Google apps (Slides™️ and Docs™️)!

 
slides for stations 1.1.png
 

Here are several ways to use task cards created in Google Slides™️ as station activities during Test Prep Review. Creating task cards in Google Slides™️ is really simple - just use one slide per question/prompt (NOT four questions per slide). It also helps to change the slide size to 11 x 8.5. To me, this is the best approach because you can print in various ways to get the maximum use out of your task cards.

review game image.png

Game Cards

Using Google Slides™️

GAME CARDS: Use task cards created in Google Slides™️, cut them out individually, and use them as board game cards. You can even throw in “skip this turn” or “jump ahead 1 space” cards to make it feel like a game. I was able to just do a simple Google search for a game board template. I just printed it large (on 4 pieces of paper), taped it, and laminated it. This was so easy to throw together last minute because I already had task cards created in Google Slides™️. I had some students write the answers on the backs of the cards when they finished work early the day before. Easy Peasy!

Grab your free template

Task Cards with

Word Bank

Using Google Slides™️

TASK CARDS WITH A WORD BANK: This is a great spin on “traditional” task cards! This is especially helpful for differentiation or if you have classes of students who are below grade level. Here’s how it works: Students are given a sheet with 2 columns: questions and answers (shown below). Taped around the room are folded papers with a vocabulary term shown. This is the word bank, so the word bank is displayed all over the room. I had students remain seated at their desk to fill out their sheet with the answers. They raised their hand for me to make sure they’ve filled in all their answers. Once I gave them permission and a highlighter, they would walk up to an answer (displayed on the wall) and unfold it to display the question it belongs to. They will mark on their answer sheet as correct or incorrect. They will continue this until they’ve checked their entire paper. I have the grade breakdown on the board, so they can score their paper and turn it in. This gets so much accomplished!! Students have access to a word bank, they get to move around and use highlighters, and I don’t have to grade any of it! 

Grab your free template

task+cards.jpg

Traditional Task Cards

Using Google Slides™️

TASK CARDS WITHOUT A WORD BANK: Of course, use the task cards created in Google Slides™️ as standard task cards. I tape them in the hallway to get students moving and to spread them out some. I especially like to spread students out during stations to keep the noise level down and to limit the “talking to students in other groups” scenarios.

Grab your free template

Task Cards copy.jpg

Worksheet-Style Packets

from Task Cards created in Google Slides™️

WORKSHEET-STYLE PACKETS: We’re still using the same task cards from Google Slides™️! Instead of printing them individually, print them 6 slides to a page, portrait. Then, you can staple them and use as study guide packets. You can use these for students to work independently or in small groups - it’s very versatile!

Grab your free template

Slide2.png

Review Game in Present Mode

Using Google Slides™️

REVIEW GAME IN PRESENTATION MODE: Use the task cards you created in Google Slides™️ in presentation mode as a whole group review game! Because you have one question/prompt per slide, you can just click on “present” and go! Display one prompt, have groups answer and keep score! 

Grab your free template
Buy 5th Grade Social Studies Version

Another perk to this Google Slide™️ task card strategy is that you can “Make a Copy” to create an answer key. Then, because Google gives you a link, you can easily send the answer key out to Remind (or another messaging system) days before the test. This way, students and parents have access to the CORRECT answer key to study. I have had GREAT success with this strategy.


jeopardy game.png

Jeopardy-Style Review Game

Using Google Slides™️

JEOPARDY-STYLE GAME: This game is a lot of fun, but it does take more prep work. I have a free template for you to use, so you can skip most of the legwork! The first slide is the dashboard slide where all the links are located. You will have your 5 categories and the number of points from 100 - 500 in each category, similar to Jeopardy. The group will choose their category and point (Ex. History, 300). You will click on “300” in the History column. This will take you to the prompt. The group will answer, you’ll check, and click “Go to Menu” and it’ll take you back to the dashboard slide. 

Grab your free template
Buy 5th Grade Social Studies Version (pictured)

qr codes 2.png

QR Codes

for Test Prep and Review

QR Codes are a great tool to use in the classroom that have access to technology. I know, QR Codes are nothing new! There are a ton of ways to use them, though! This is especially true for test prep because students (and you) are typically burnt out on test review during this time of year. The QR Code can add just a little “something different” to hold their engagement during test prep. Here are a few of the many ways to use them.

  1. QR Code to display the question/prompt. As pictured, simply put the prompt number and the QR Code on the page to display around the room or in the hallway. Students have an answer sheet to record their answers. They’ll scan to view the prompt and record their answer. Typically, I do not make students go in numerical order - just find an empty question page. If this is the case, make sure the answer sheet already has the numbers to avoid confusion. You could even have them number their paper before they begin. 

HOW-TO: I used Google Docs™️ to type my questions because Google gives you a link. This was easy for me to paste into the QR Code generator box. Of course, there are a million different ways to do this! I created one Doc for each prompt and copied the “share link”. Then, just do a Google search for QR Code generator and follow their prompts. One thing to look out for: Expiration Date. Some QR Code generators expire after one year, so be mindful of this if you’re planning on using this activity next year! Once the QR Code is set up, just copy and paste it into your prompt number sheet. Slides is a great option for this so they’ll all be in ONE place, but that’s totally optional.  

2. QR Code to reveal the correct answer. Place the QR Code close to the question for students to use to self-check. They’ll answer the questions, then scan the code to reveal the correct answer. 

HOW-TO: Use the same steps as before except insert the QR Code into the task card. 

3. QR Code to lead to notes or videos about a topic. I used this most during review time, not during the introductory phase of instruction. You can definitely use these QR Codes during the introductory phase. It’s just my personal preference to use them during the review phase. I STRONGLY believe in the power of self-assessments, mostly for science, social studies, and math (ELA is just a different animal). I use the QR Codes to lead students to extra notes/videos on the self-assessment page. My self-assessments also serve as a study guide. Providing the QR Code in addition to the IN Notes page number gives ALL students the opportunity to study the concepts regardless of the state of their notebook. It also gives parents the opportunity to watch a quick video on the concept to help their child understand. This was especially helpful when I taught 7th grade Life Science. Below is a picture of the QR Code used in a Self-Assessment.

HOW-TO: Use the same steps as before except insert the QR Code into the self-assessment.


COMING SOON! Blog Post on Using Self-Assessment and Free Templates

January 07, 2020 /Sarah Miller
Teacher Tips, Google
blog image 2.png

Grab my FREE guide!

Stop neglecting social studies with these easy to use strategies! Teach social studies, even when you don’t have time!

DOWNLOAD

Maximize Your Gmail Inbox and Your Efficiency

December 09, 2019 by Sarah Miller

If you’re like me, you probably get SO, SO, SO many emails because you’re juggling 50,000 different things at any given time! I’ve compiled a few ways that you can really maximize your inbox and have it start working for YOU! These are all so super simple, even if you’re not techy.


1.jpg

1. Automated Labels and Filters

This tip isn’t new, but it’s definitely a must! In Gmail, you can automatically add labels to incoming emails and categorize them (Spelling Bee, etc.). You can also use this to keep those Google Calendar invite responses or forum post messages from clogging up your inbox by sending them to “Archive”. 

Here are some labels I’ve used over the years: 

Spelling Bee

Young Georgia Authors

Science Fair

Tech Fair

Leadership Team

Parent Contact

Student Contact 

CCGA (the college that sent Student Teachers)

Labels are a GREAT way to keep organized, however, it’s so easy to forget to add the label every single time you get one of these emails. Here is my timesaver: create automated filters to label these as they’re coming in! This may not work for every label you create, but it can definitely work for some. It just depends on the situation. Of the labels listed above, I automated the following: Spelling Bee, Young Georgia Authors, Science Fair, Tech Fair, Leadership Team, CCGA. I was unable to automate parent and student contact because there are too many email addresses to input and there are no common key words. 

Here’s How: 

  1. In Gmail, click the drop-down arrow INSIDE the search bar (at the top of your inbox). 

  2. In “Has the words” type in the key word that will be found in the emails. For example, I’ll type Spelling Bee and click “Create filter”

  3. This is where you have options! I choose “Apply label” and select or create label. Apply any other options (I usually don’t add any others except “Skip the inbox” occasionally), then click “Create filter”. 

  4. DONE! Test it out! Send yourself an email with the keywords you selected and see what happens! It should automatically add the label to the incoming email BEFORE you open it! You can use the left sidebar to view all emails in that particular label. Now, they’re all waiting in one place for when you when your mind is ready to take them on! 

2.jpg

2. Unread Emails at the top

This one is GREAT if you get a million emails in a day! I didn’t necessarily need this when I was teaching, but when I began as Instructional Technology Coaching, it was a LIFESAVER! I used to be able to get away with leaving emails that needed my attention unread to come back to them. That no longer worked when I started getting around 30 emails in a work day. Luckily, Gmail has my back! I’m able to set up my inbox to keep all of my unread emails (no matter the order in which they come in) at the top and all the read emails underneath. 

Here’s what it looks like: 

 
Screen Shot 2019-12-09 at 9.54.35 AM.png
 

Here’s How: 

  1. In Gmail, click on the settings gear, then click “Settings”. 

  2. Click on “inbox” in the top bar 

  3. Click the drop-down next to “inbox type” and select “unread first” 

  4. Click on the word “Options” next to “1. Unread” and select the number of unread emails to display. (I set mine to 10 items). 

  5. Click “Save Changes” at the very bottom, and you’re done!

3.jpg

3. Google Tasks

Google Tasks is one of my favorite productivity tools. It can really be a game changer because it integrates with your email and calendar. It even has an app version that will send you notifications! It saved my sanity and kept me on track when we have a million things going on! Tasks has a sidebar inside your Gmail, so you can add and organize your tasks while you’re checking your email. You can even turn an email into a Task with a deadline/reminder! 

4.jpg

4. Templates

Templates are ALWAYS timesavers! I always get really anxious when I’m contacting parents - I want to make sure I word everything exactly right. I used to spend so much time rewriting or pulling up old emails to copy-and-paste. Now, I have templates set up for emails that I either struggle to write and get perfect or for emails that I send frequently (meeting reminders, notes, etc.). 

This is a feature that you may have to “enable”, as it does not always default enabled. Don’t worry, it’s just a few clicks! 

  1. Login to your Gmail account 

  2. Click on the “settings” gear in the top right corner of your inbox

  3. Click “Advanced” 

  4. Click the “enable” option next to “Templates” 

This process enables the template feature, so once you do this, you shouldn’t have to repeat this step.  


To create a template, simply draft the email you want to use as the template (Click “Compose”, type in the subject, and type up the email, leave the “TO” blank for now). Then click the “more” three dots in the bottom right of the draft. Click “Templates” and “save as template”. Now, you’re done!


To use a template you’ve already created, open a fresh draft (Click “Compose”). Click the “more” three dots in the bottom right of the draft, click “Templates”, and select the template you want to use. This should auto populate your email to match your template. Fill in the recipient, and you’re ready to send! 

5.jpg


5. Events from an Email 

Y’all this is SO good! I live by my Google Calendar, so being able to create an event straight from Gmail is a major timesaver! From an email, you can create an event that will save to your Google Calendar. 

Here’s How: 

  1. Open the email from which you want to create the event

  2. Click the 3 dots “more” icon at the top bar (above the email). See image below. 

  3. Click “Create event”. This will open a new window in Google Calendar

  4. Complete the prompts and “Save”. This will attach the email and its contents to the event in Google Calendar. 

6.jpg

6. Schedule an Email 

This is one my FAVORITE features!!! I love being able to schedule emails, especially if it’s a reminder email for deadlines. I was responsible for our middle school’s Spelling Bee, so I relied on scheduling email reminders. Nobody has time to compose reminder emails in “real-time”! I would take a chunk of about 15 minutes to compose several emails and schedule them out as reminders for the Spelling Bee nominees. For example, I would schedule one email as the “initial” email announcing the rules of the Classroom Spelling Bee and the time frame for which this needed to be completed. Next, I would schedule an email reminder two weeks before the deadline for Classroom Spelling Bee winners. Then, I would schedule a reminder one week, then one for 2 days prior to the deadline. I would compose and schedule these all in one sitting whenever I had the 15-minute time chunk sometime in September. This is like email’s version of “set it and forget it”!! 

These emails are still editable after you’ve scheduled them (before they are sent). So you can edit the email, subject, and recipient any time before the email is sent. You can also cancel the email. 

Here’s how: 

  1. Compose a new draft 

  2. Type up your email, subject, and add your recipients 

  3. Click on the dropdown arrow NEXT to “Send” 

  4. Follow the prompts to select your send date and time


    Edit your scheduled email: 

  1. Click on the “Scheduled Send” inbox in the left sidebar

  2. Select the email and edit as needed

7.jpg

7. Contact Groups 

I find that I often email the same group of people, over and over. I taught middle school, so I was frequently emailing the other 5 teachers on my academic team. I was also involved in lots of committees and was emailing those groups of people frequently. Contact groups are a major timesaver in this case! No longer do I type in each person’s name in the recipient box! Now, I just type “7C”, which is what I named my academic team’s group, and it auto populates all 5 teachers’ email addresses into the recipient space! I can also type “rti” for it to autofill the teachers on that committee. This is completely customizable to save you the most amount of time. 

The contact groups have changed with Google’s new updates. So, this process may look a little different if you’ve set them up in the past. 

Here’s how to set it up! 

  1. Open a new email draft (Click “Compose) 

  2. Click on the word “To” (where you normally type in the recipient’s email address) 

  3. Select the email contacts you want to include in your group  **You might have to toggle to “All Contacts” instead of “My Contacts”**

  4. Click “manage labels” 

  5. Name and Create

  6. Insert (this will add these emails to the recipient space)

Next time you want to email this group: 

  1. Open a new email draft

  2. In the recipient space, type the name of the group (7C or rti, etc.)

  3. Press “Enter” key and it should automatically change from the group name to the separate email addresses of all in the group 

  4. Continue the email as normal! 

 
Icons.png
 
December 09, 2019 /Sarah Miller
Teacher Tips, Google
blog image 2.png

Grab my FREE guide!

Stop neglecting social studies with these easy to use strategies! Teach social studies, even when you don’t have time!

DOWNLOAD

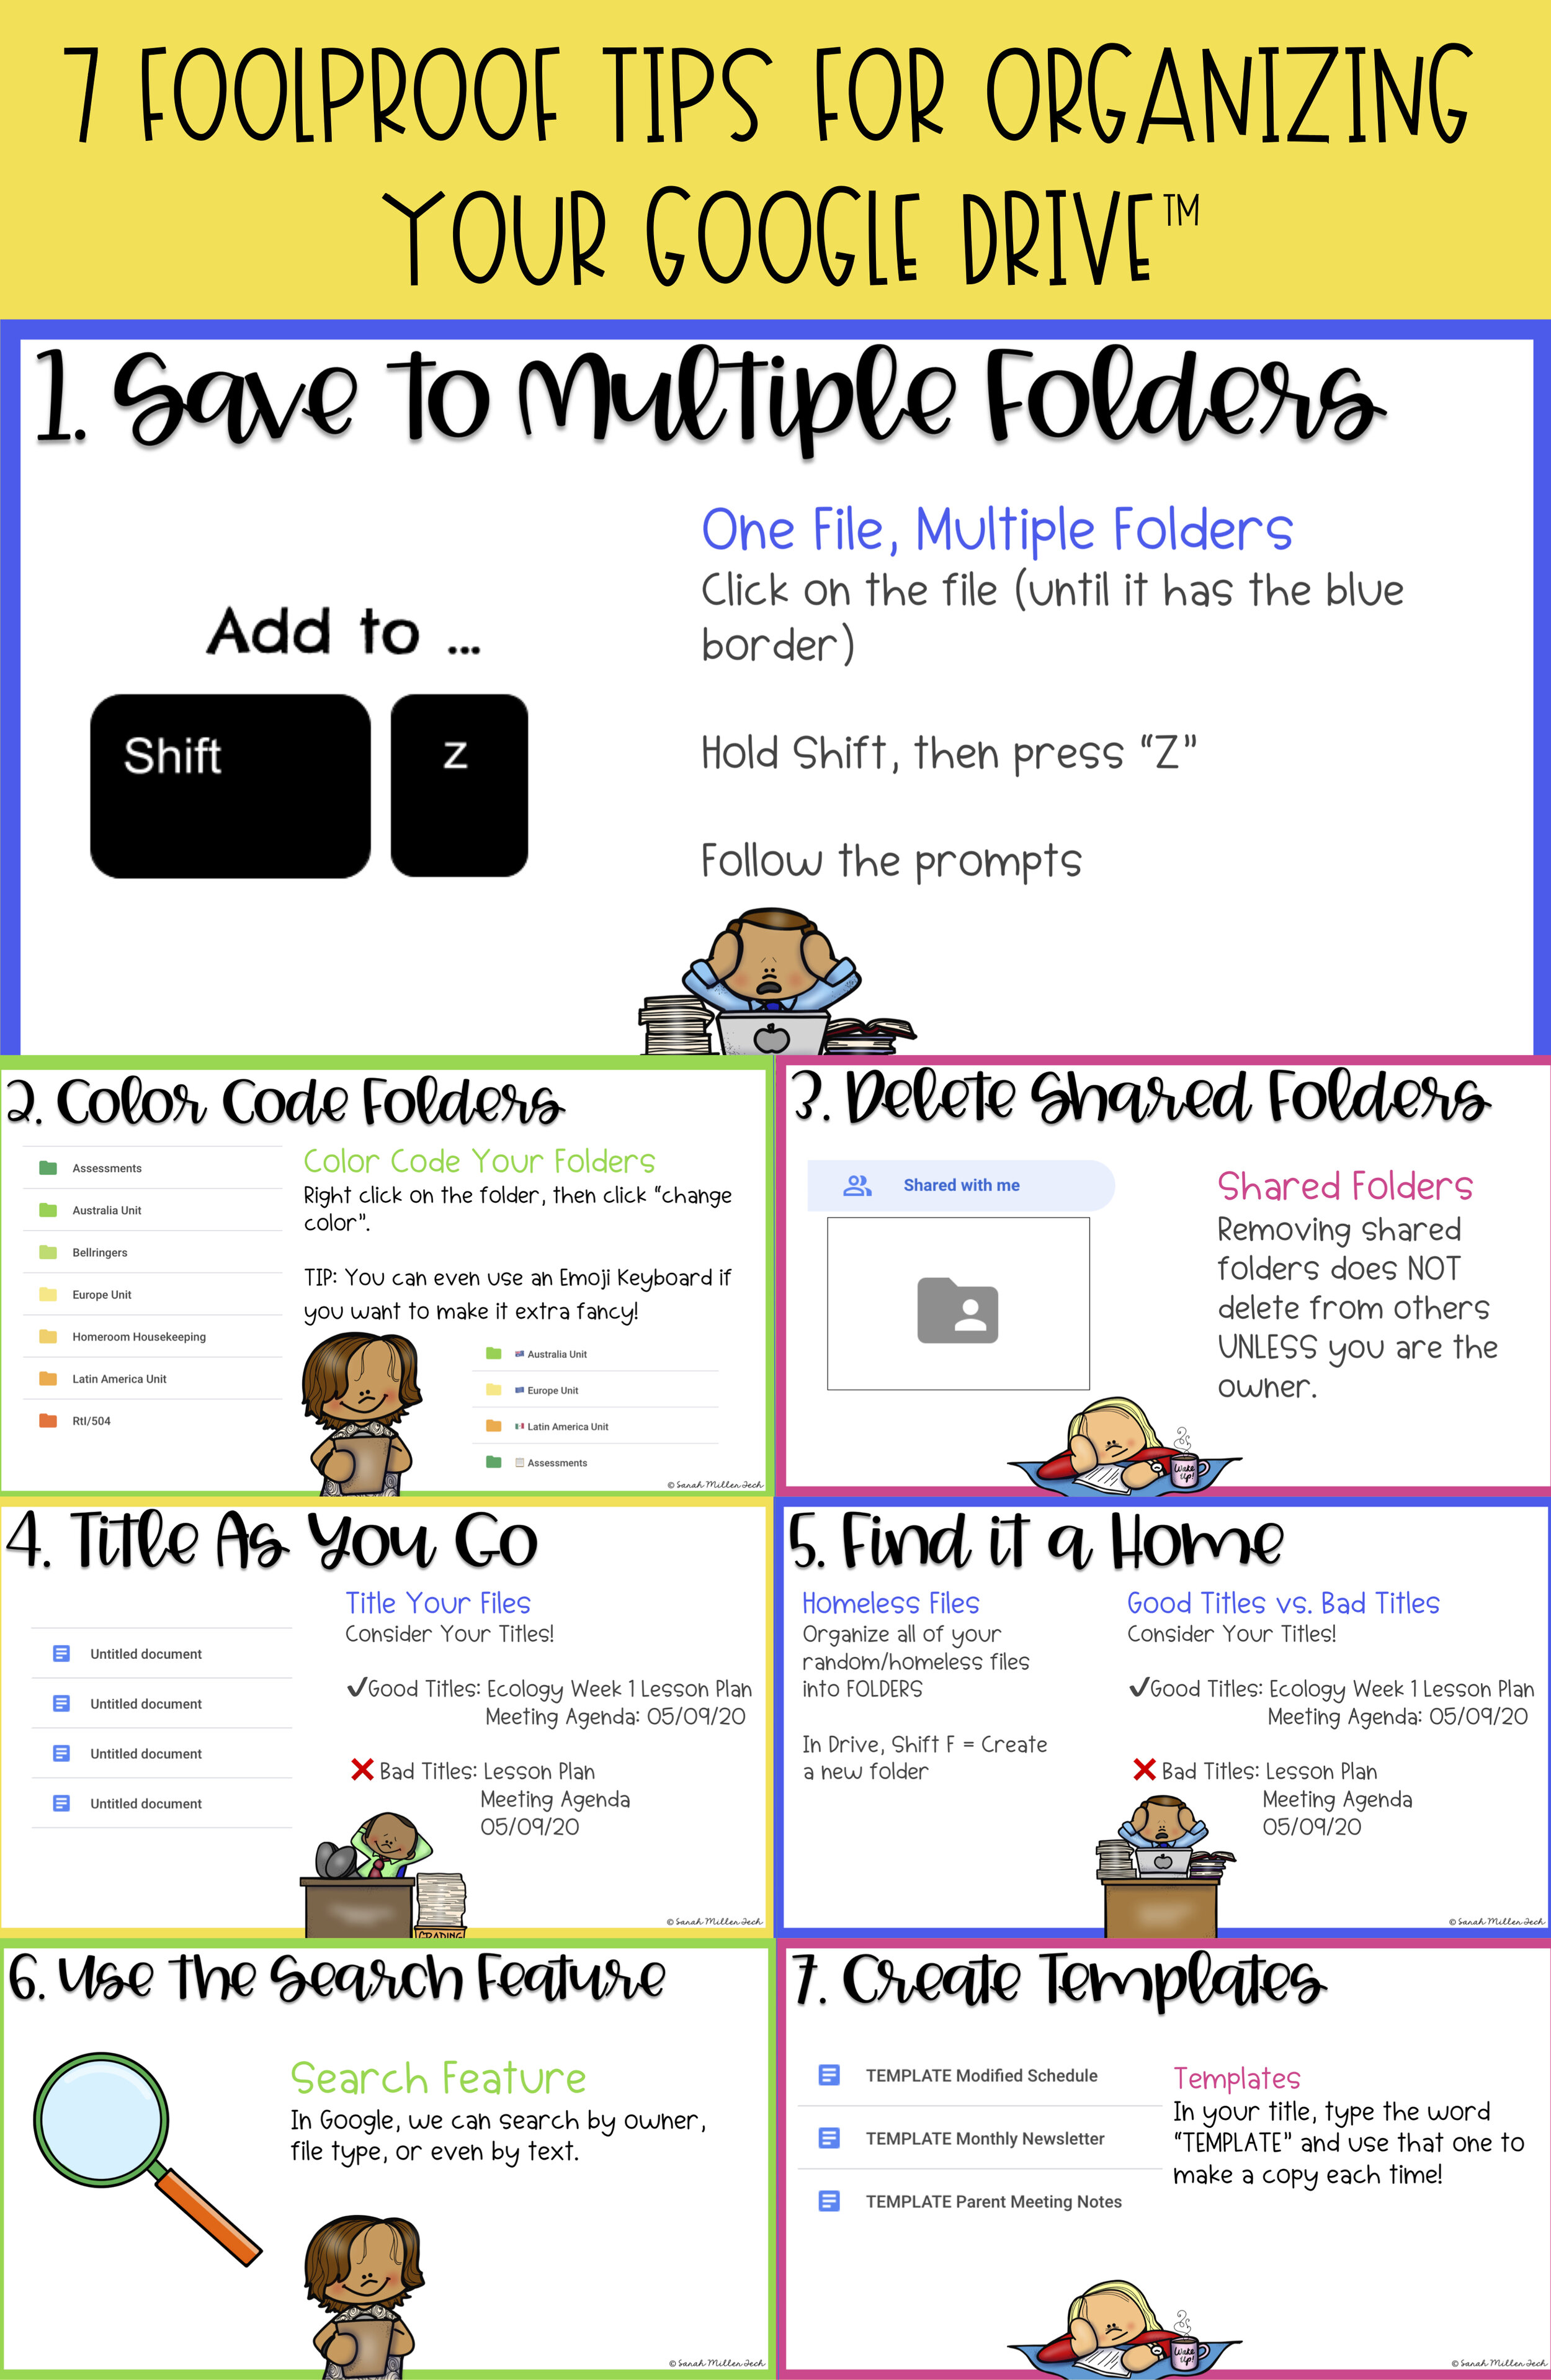
7 Foolproof Tips for Organizing your Google Drive™️

November 26, 2019 by Sarah Miller

I know sometimes our Google Drive can get totally out of hand! We’re just so busy and doing a billion things at once, so organizing strategies are usually last on our minds. I have 7 foolproof tips for you to get your Google Drive organized and to KEEP it that way!

1.jpg

1. Save to Multiple Folders - Save a file to multiple folders WITHOUT making a copy! These files will be synced and will update at the same time. Click on the file once (so it’s highlighted blue), then press Shift Z, and follow the prompts.   

2.jpg

2. Color Code your Folders - We can all use a little COLOR in our lives, am I right?! You can add color to your folders by right clicking on the folder, and clicking “change color”. 

3.jpg

3. Delete those Pesky Shared Files - Have you opened your “Shared with Me” folder and had an IDEK reaction?! If you are NOT the owner, you can delete these files without affecting everyone else’s. BE CAREFUL! If you are the owner and delete the file/folder, it will delete for everyone else, too. If you are unsure, just right click the file, click “View Details”, and the owner’s information will appear. 

4.jpg

4. Title Everything You Add/Create as You Go- I know this sounds obvious, BUT we all have our moments of “I’ll do that later”. Microsoft Word prompts you to title and choose a save location before you exit; Google, however, autosaves, so you must add the title on your own! #dontforget 

5.jpg

5. Find a Home for your Homeless Files (Take Advantage of Folders) - Just as you do with any other storage (flash drive, documents, etc.) organize your files into folders. You can even put subfolders inside your folders! Don’t be afraid of creating folders! 

6.jpg

6. Search Features - I definitely use the search feature more than I’d like to admit...I can never remember what I titled it! Luckily, Google has my back! We can search by owner, file type, or even by text! The search by text even works for text inside your pdf files! Say Whaaaat?! Just click the drop-down arrow in the search bar at the top of your Drive, and voila! 

7.jpg


7. Create Templates for Yourself! - Create your Doc, Slide, Sheet, or Drawing, but in your title, type the word “TEMPLATE” and use that one to make a copy each time. For example: “Modified Schedule TEMPLATE”. Next time you need the template, find it in your Drive, Make a Copy, and fill that sucker out! 

 
Infographic.jpg
 

Switching from OneDrive to Google Drive? Check out Google’s Quick Guide! 

Copyright Clip Art Images ©EduClips


November 26, 2019 /Sarah Miller
Teacher Tips, Google

© Sarah Miller Tech ∙ Powered by Squarespace ∙ Privacy Policy ∙ Terms of Use ∙ Disclaimer