Sarah Miller Tech

  • Home
  • Webinars
  • Blog
  • Shop
    • Shop Resources
    • eBooks
    • Shop T-Shirts
  • Free
blog image 2.png

Grab my FREE guide!

Stop neglecting social studies with these easy to use strategies! Teach social studies, even when you don’t have time!

DOWNLOAD

Creating a Jeopardy Game in Google Slides™️

July 14, 2020 by Sarah Miller
 
Blog Thumbnails .png
 

As you know, jeopardy-style games can be a really fun way to review content with your students. They are a great test prep activity! You might be really excited about the idea of creating your very own game in Google slides or maybe you’re a little worried about it – either way, I’m going to share some simple steps with you on how to create your very own jeopardy-style game on Google Slides! I will

have linked in the description below a step-by-step guide, so you can view that after you watch the video. There will also be a link to a generic template, a planning workbook, and a review game that you can purchase that is ready to go (if you’re 5th grade social studies)!

Before we jump right into the techy stuff, I recommend that you go ahead and do some planning before you start creating. You’ll need to know how many categories you want and how many points. Plus, you’ll want to have your prompts and answer key on hand. To help you out with the planning process, I created a free digital planning workbook that’s linked below. It’ll make this process super easy because you can just copy and paste your prompts from there into your new game!

3027250 Simple MacBook Pro on table.jpg

Digital Planning Workbook

in Google Slides™️


Completed Version

5th Grade Social Studies Example

Game Board Slide
Prompt Slide

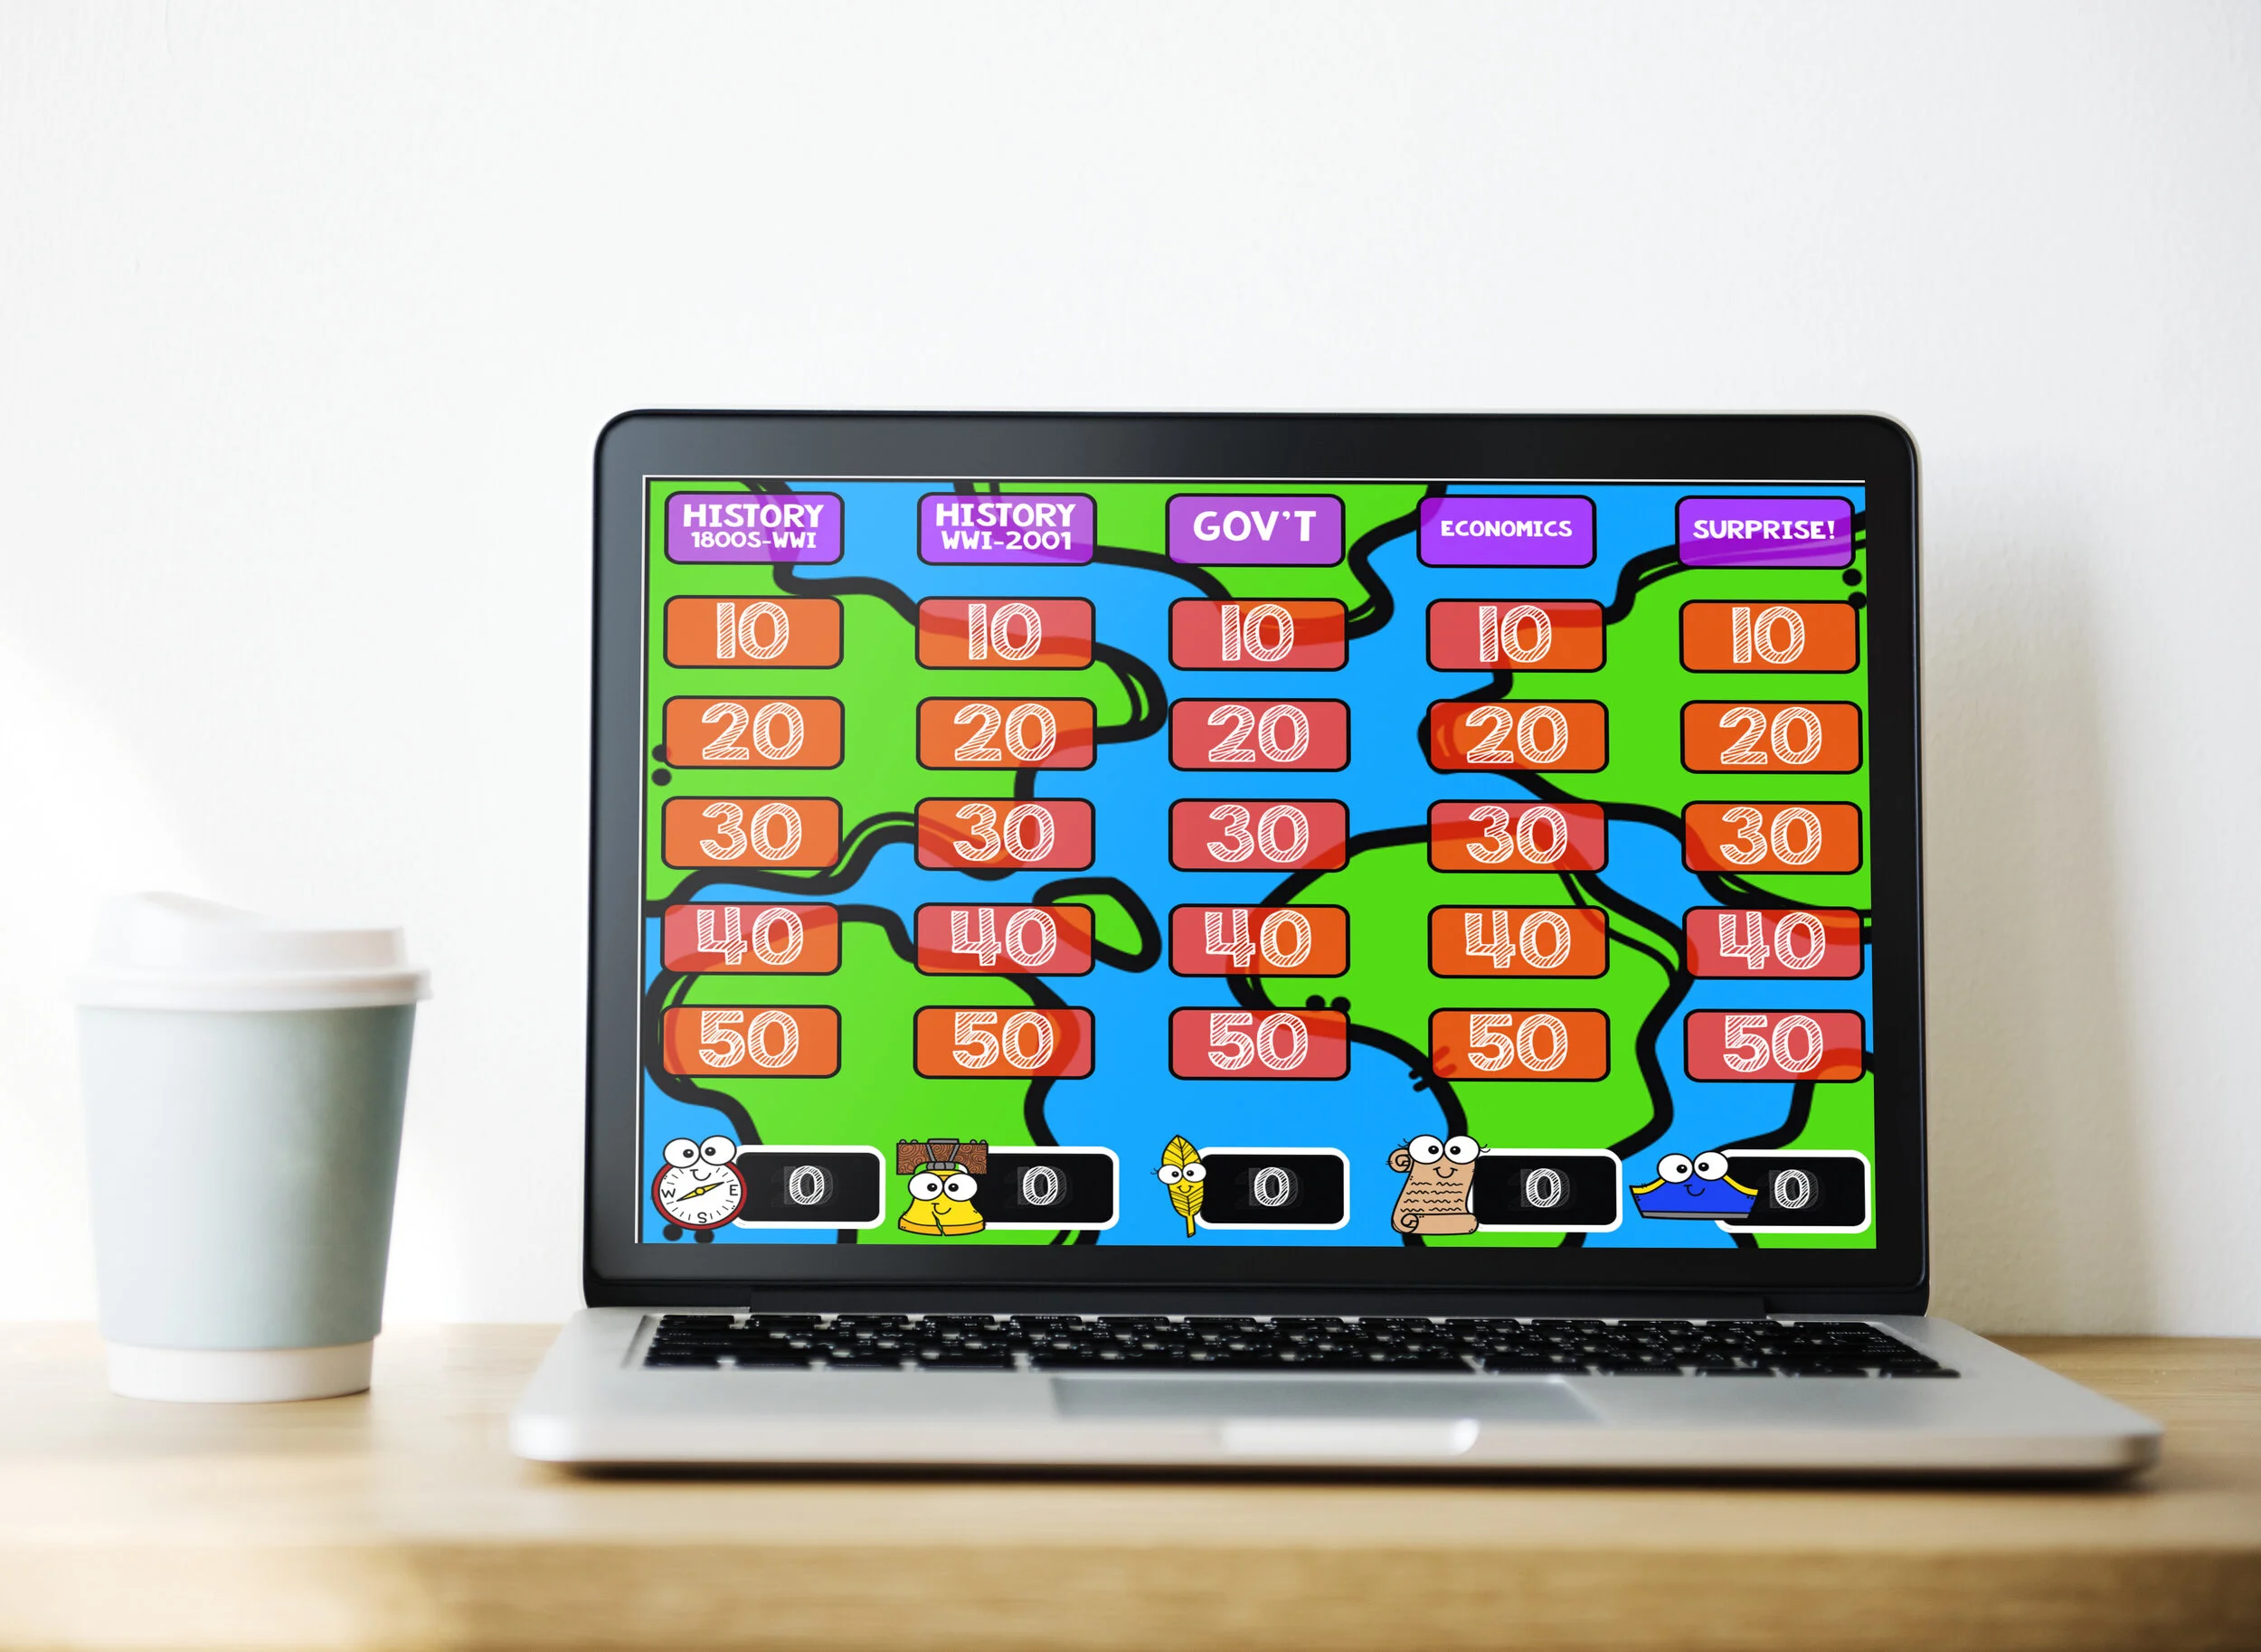
Let’s start with the end goal! The Jeopardy-Style review game includes a Game Board slide that is linked to prompts (Categories), which is linked to an answer slide. Consider how many categories and prompts you’d like to use. To do this, consider the depth of the content you are covering. For example, if you have a light or shorter unit, you may want to consider less prompts. So, instead of having 4 categories that range from 10 points to 50 points, you might have 3 categories that range from 10 points to 30 points.


Game Board Slide

Steps+1-4+How+to+Guide
Add point values under categories
 
Digital Template for Teachers

Prompt Slide

Printable Guide for Teachers
Digital Template for Teachers

Answer Slide

Answer Slide Directions
3027250 Simple MacBook Pro on table (3).jpg

Linking the Prompt Slide to the Answer Slide

Linking Directions

The Rest of the Prompt Slides

Duplicate Prompt Slides Directions

Linking from the Game Board

Linking Directions

blog image 5.png
Grab a free generic game template

Screen Shot 2020-05-09 at 2.28.28 PM.png
July 14, 2020 /Sarah Miller
Google, google classroom, digital activities, coaching
blog image 2.png

Grab my FREE guide!

Stop neglecting social studies with these easy to use strategies! Teach social studies, even when you don’t have time!

DOWNLOAD

Coaching Tech PD: Using Digital Templates and Printable Guides

June 18, 2020 by Sarah Miller
 
Blog Thumbnails .png
 

The “Why” Behind Using Templates

As you know, digital activities and virtual learning are becoming more and more mainstream. Maybe you’re loving the idea of coaching your teachers on digital activities or maybe you’re still not comfortable yet – either way, today I’m going to share some advice with you on how to set up your professional development in a way that will help you reach all of your teachers. I will have linked in the description below a step-by-step guide, so you can print that out after you watch the video. There will also be a link to sample templates and guides to get you started!

Using templates with my teachers was simply a game-changer for me. They truly allowed me to zero in and focus on my core objectives in a way that was effective for my “not-so-techy” teachers and my “techy” teachers.For example, if you’re trying to teach how to create a sorting activity in Google Slides, you can give your teachers a template so they can jump right into the “sorting part” instead of spending so much time on the things that have to be done to lead up to it (like backgrounds, formatting fonts, etc.). While those skills are important, they tend to make these learning days frustrating to those who are not comfortable with the technology. Before I started with the templates, I felt my teachers who were uncomfortable with the technology were getting behind and feeling overwhelmed. Once teachers feel like they’re behind and overwhelmed, it can be difficult to recover. And that can, unfortunately, set the tone for your PL.   

Providing templates and using a “breakout”-style PD helped to overcome those challenges, while still accommodating my tech savvy teachers.

We called it a “breakout” style PD because I would give little directions before teachers partnered up and began creating. I would go over my objectives, then show a “goal activity”, give them their printed guides, and let them create. Once they finished and turned in their work, they were dismissed. This was great for my tech savvy teachers! They were much more involved because I was still able to give them little nuggets of information they didn’t know before, but they weren’t “stuck” waiting on everyone to finish. I feel like this also had a positive effect on my “not-so-savvy” teachers. They seemed to be more relaxed because they weren’t rushed, and they didn’t feel like they were “wasting” someone else’s time. Plus, they got me more one-on-one. For us, this strategy was successful! 

Let me show you some examples of the templates and guides we used!


Examples

Upper Grades Example

Screen Shot 2020-05-28 at 9.58.40 AM.png
Screen Shot 2020-05-28 at 10.04.39 AM.png

Let’s start with an 8th grade social studies template. Above is my objective for this particular Tech PD. Now, this is a long list of objectives because we worked our way up to this. Know your teachers! If they, as a group, aren’t ready for this many just pick one or two. See the “Breakout Guidelines”. This was displayed, so teachers could see the keyboard shortcuts.

Printable Teacher Guide

Printable Teacher Guide

Digital Template for Teachers

Digital Template for Teachers

This template has a lot that is already created for teachers for a couple reasons. One, I wanted to expose teachers an interactive lesson that had a variety of activities. Two, I wanted to focus only on my learning objectives. My learning objectives don’t require them to write a whole passage or even copy and paste one, so I did that part for them. They must start by inserting the text placeholders. Also, my learning objectives don’t include finding a background or formatting titles, so I did that for them. I want them to spend their time with me wisely – the last thing I want is to waste their time.

On the slide above, all teachers were required to do is create the items to be sorted and link in a “hint”. The directions for these was located on the printed packet. Switch screen to the “Tasks” Doc.  

With an activity like this, I would typically include a completed version of the activity to the teachers afterwards. I really tried to be aware of what the teachers were teaching at the time and I tried to create activities that reflected that.  

This is just one sample, and it’s pretty complex. Now, let me take you through an example from lower grades.


Lower Grades Example

Printable Guide for Teachers

Printable Guide for Teachers

Digital Template for Teachers

Digital Template for Teachers

Above is a template we used for 2nd and 3rd grade teachers to create their own math and literacy printables. As you can see, this looks very different from our other example because the learning objectives and the needs of the teachers are very different. In both slides of the template, the teachers are given a big head start. They are basically completing the pattern I set up for them using the guide.

This is the guide for teachers to use while they’re working with their template. As you can see, it has every single detail written out. This, honestly, is a TON of work for me. However, it was SO worth it. Teachers were so much more comfortable and engaged when they had these printed guides.


thumbnail.png

Don’t have time to make your own printable guides?

I’ve got you covered!

Click Here!

Tips for Implementation

Using templates in tech PD can be a major step towards meeting the needs of your teachers, no matter where they fall on their technology comfort-level.

Slide1.png

When you’re creating your template and PD, make sure that you have a clear objective in mind. What skills are you really wanting your teachers to be able to do when they leave today?


Your whole template and guide should revolve around those objectives. You can even split up groups with different objectives. Just be clear on what your takeaways are. This is a great way to increase buy-in for your tech resistant teachers and your tech savvy teachers!

The whole point of using templates is so that you can really zero in on your objectives, so make sure that your template takes care of all the “background” work. If you’re teaching how to insert text placeholders for students to type their answers in a Google Slide activity, go ahead and put in a sample passage or prompts to scaffold that learning. You don’t want your teachers wasting 10 of their 30 minutes with you trying to find a background they like or hand typing a passage.

I’ll be honest, when I first started, I did not provide step-by-step guides. I just modeled how to do it, we practiced it, and that was it. I got request after request for printed step-by-step guides. I finally decided to make one, and it was a TON of work. I was like, “no way – this takes waaayyy too long. It’s not worth it.” Until the next PD and I saw the impact it had. These guides were great for those who wanted to keep a hard copy of what they learned for later reference, but it was also what led to a shift towards the “breakout” style tech PD. With the guides, teachers were able to be more independent and work more at their own pace. This was well-received by teachers at all tech comfort-levels.  

Slide4.png

This just means to try to eliminate wasted time searching for clip art. For example, I had 1st grade teachers create an interactive number bonds activity with a farm theme. I provided a folder with farm clip art, so they wouldn’t have to waste time searching on Google for the clip art. Sometimes this isn’t a big issue, but my lower grades were on such a limited time frame for PD. We had a 30-minute block, but by the time everyone gets settled, logged in, etc. we had closer to 20 minutes. I really tried to include everything they’d need, so we could focus on the objective.

Each time your teachers come to a Tech PD, challenge them to use keyboard shortcuts. This will help increase their efficiency. The key to this is to ask them to use a specific shortcut for each activity. This helps them practice it in a relevant setting. For example, the shortcut for “copy and paste” might be more relevant than the shortcut for “print”. When you’re giving your overview of the template, share their “shortcut challenge” and demonstrate how it works.


guide cover.png

Grab your Guide & Free Templates

Grab your Guide!

Screen Shot 2020-05-09 at 2.28.28 PM.png
June 18, 2020 /Sarah Miller
Google, google classroom, digital activities, coaching
blog image 2.png

Grab my FREE guide!

Stop neglecting social studies with these easy to use strategies! Teach social studies, even when you don’t have time!

DOWNLOAD

Distance Learning: Creating Geography Activities in Google Slides™️

May 26, 2020 by Sarah Miller
 
vlog 1.png
 

As you know, we’re teaching in different times. Maybe you’re killing it with this whole distance learning thing, or maybe you’re not – either way, today I’m going to share some advice with you on how to create these digital interactive activities. I’ll leave you with a step-by-step guide, so you can print that out – it’ll be like having me right there by your side!

Slide1.png

Drag and Drop activities can be used in a thousand different ways, and they are really great for geography!

Now, one common problem we face is that students will be dragging everything all over the place, not just the circle, and the slide gets all messed up. You have a couple options to solve this problem. 

1: Create all your non-movable pieces in PowerPoint, then use them in Slides.

This is my preference: Create your backgrounds (directions, map, etc. basically anything that needs to stay put) in PowerPoint, export them as images, then set them as a background in Slides. 

2: Create everything in Slides, but your non-movable pieces in Master Slide view.

If you’re like, “who the heck has time for PowerPoint AND Google Slides?!” Then this option is for you! You can create your backgrounds (all the non-movable pieces in the Master Slide view.

NEED A STEP-BY-STEP GUIDE? SCROLL TO THE BOTTOM OF THE POST!

Drag and Drop: Circle (or Shapes)

Drag and Drop: Circle (or Shapes)

Drag and Drop: Labels

Drag and Drop: Labels

Master Slide View in Google Slides

Master Slide View in Google Slides

Fill in the Blank using the “drag and drop” method.

Fill in the Blank using the “drag and drop” method.

Types of Activities you can create with Drag and Drop:

  • Drag the circle to _____. (See image above.)

  • Highlight (insert a semi transparent shape to act as a highlighter)

  • Match the labels to the correct location (see image above).

  • Fill in the Blank

Vlog 1 Icon Headers.1.png

Students definitely enjoy these types of slides much more than the others. However, I have found that I get much better responses if I provide them a template. I think we’ve all been there! Give them a blank slide and they spend a thousand years on their backgrounds and fonts. No more! I have a few ideas that will help you with this, and I go into a deep dive in a different blog post. CLICK HERE TO SEE THAT BLOG POST!

This time for your non-movable background pieces, you are going to have a table instead of a map or text. I highly recommend you either use the Master Slide or create in PPt. Students can get this table so messed up that it’ll practically be beyond repair! You can put whatever you want in the table for students to find. I like to have one slide dedicated to MAP images, and one slide dedicated to REAL images of the places. Students usually enjoy researching real images of new places!

Research: Students insert images to their slides

Research: Students insert images to their slides

Research: Students insert text into their slides

Research: Students insert text into their slides

These activities are perfect for distance learning and for blended classrooms! The possibilities are really endless here! I have created similar activities for science, social studies, and language arts. One drawback, though, with these Google Slides is that grading can be cumbersome because you have to open each student’s slide and scroll around. One tip I have for you is either grade directly in the Google Classroom portal so you can use the arrows to scroll from one student’s work to the next or to use Alice Keeler’s Drive 20 extension. I’ll have it linked below. Basically, you click on her extension and it will open up to 20 files at once. You’ll have to wait for them to load, but then you can switch from one student’s work to the next by the tabs at the top of your browser window. Another tip is to only grade this for completion, and then have students complete a Google Form activity with the same or similar skills and take that for a grade to show mastery


Thumbnails .png

Grab your Step-by-Step Guide

Grab your Guide now

Slide1.png

Africa Geography

Activity in Google Slides™️

Shop Now!

I want to hear from you!

What are YOUR go-to activities for geography? Let me know! Tag or message me on Instagram!

IMG_0170.JPG

Instagram

@SarahMillerTech

May 26, 2020 /Sarah Miller
social studies, geography, distance learning, Google, google classroom
blog image 2.png

Grab my FREE guide!

Stop neglecting social studies with these easy to use strategies! Teach social studies, even when you don’t have time!

DOWNLOAD

6 Tips to Get High Quality Work from Students during Digital Activities

May 25, 2020 by Sarah Miller
 
Vlog 2 Thumbnails .png
 

The “Why” Behind Using Templates

As you know, digital activities are becoming more and more mainstream. Maybe you’re loving the digital activities or maybe you’re still not comfortable yet – either way, today I’m going to share some advice with you on how to set up your digital activities so that you get quality work back from your students. I’ll leave you with a printable guide and access to sample templates. Find that at the bottom of the blog post!

Using templates with my students was simply a game-changer for me. Even though I loved using technology in the classroom, I avoided the “create a presentation” type of assignment like the plague. It seemed like every time we did an assignment like that, my students would spend 3 days or even a week, and then turn in nothing of quality. They’d have all kinds of crazy background images and wacky fonts, but their content was really lacking. Then, I had the crazy idea to give them a template. In Google Classroom, I can give them a pre-made template in Google Slides and assign it in a way that each student gets their own copy to edit. Life-changing Moment. 

There are so many advantages of using a template. First, it gives structure to the assignment. You are able to set very clear expectations on each and every slide RIGHT where they’re looking (as opposed to on a paper with a checklist). Second, it allows you to truly differentiate. You can send different templates to specific students. Also, templates allow you to take advantage of using visual clues which helps students know where to place images and text on the same slide in a way that makes sense to a viewer.

Personally, I used templates with 7th graders. During my instructional technology specialist days, I’ve seen this work for grades ranging from 2nd all the way up through the middle grades. I’ll share some examples of different grade level templates with you.

Tips for Implementing Digital Templates

I have 6 tips for implementing digital templates with your students. These tips will help you get high quality work back from your students as they work in digital assignments.

Slide1.png

When you’re creating your assignment, make sure that you have a clear objective in mind. Are students exploring? Are they applying knowledge? Or are they being assessed? Once you have determined your objective, be sure to design your template in a way that best fits your objective. Avoid assigning the template just so you can say you’re using technology! 

Also, when you’re creating your template, think about expectations and make those clear on each slide. For my students, I typically included the title of the slide and directions. Students should not have questions about WHAT to do. They should only have questions about HOW to do it.

Slide2.png

You’ll want to make sure you give a thorough overview of the assignment and your expectations before you allow students to even login to their devices. So, after you’ve created and assigned the template, show your students how to use the template. For example, show them to move the red text lower so they have room to type without deleting it. I can’t tell you how many times I’ve had a student say they don’t know what to do because they deleted all the red text FIRST, before completing it. Model moving the text and emphasize the importance of keeping that text there until the end.

Slide3.png

Each time your students work on a digital assignment, challenge them to use keyboard shortcuts. This will help increase their efficiency. The key to this is to ask them to use a specific shortcut for each assignment. This helps them practice it in a relevant setting. For example, the shortcut for “copy and paste” might be more relevant than the shortcut for “print”. Have a running list in your classroom, so you can add new shortcuts throughout the year. When you’re giving your overview of the assignment, share their “shortcut challenge” and demonstrate how it works. If you are unfamiliar with keyboard shortcut options, simply do a Google Search of “Chrome keyboard shortcuts” and a list will pop up for you.

Slide4.png

From experience, it takes FOREVER for some students to decide on their backgrounds and fonts (we called this “decorating” in my classroom) To keep them on track, I’d set a timer at the very beginning. When the timer runs out, you should be working on the content of your assignment – no more decorating. Remind students that they need to choose a theme first because if they do it last, it might affect the formatting – meaning it might move their images and text around and they’ll have to go back and fix it. For my 7th graders, I would give them between 5 and 10 minutes, depending on the group of students. Use your judgement there and you can make adjustments for the next time. Now, they don’t need to spend the entire 5 to 10 minutes decorating- they can move on when they’re ready.

Slide5.png

Just like any assignment, some students need help moving forward. I noticed that some of my students would get fixated on choosing that “perfect” picture for their presentation. Look out for this, take note, and be patient with them. Sometimes having too many options can be overwhelming. After class (or during if you’re limited on time), go into the student’s assignment and insert 3 picture options. Ask them to choose 1 from those they like and delete the other 2. You can also do this with prompt responses, too. If an open-ended question is too overwhelming, offer support via feedback in their assignment. Then the next day before students open their assignments, tell them some might have a message from you. They’ll need to check for that first before moving on.

Slide6.png

Consistency always makes things easier! I know that not every assignment will be the same, so the templates should not be the same either. However, being consistent with certain things will make life easier. For example, keep all the text that should be deleted the same color. I chose red. So in every template we ever used, red text indicates text that should be deleted. Also, for every template, my feedback or notes were always in purple text. If a student saw purple text in the margins, it was likely a note from me.

guide cover.png

Grab your Guide & Free Templates

Grab your Guide Now!


CIRCLE F REVISED.4 copy.png
 
Blush Pink Photo Mother's Day Instagram Post.png
May 25, 2020 /Sarah Miller
Google, google classroom, digital activities

© Sarah Miller Tech ∙ Powered by Squarespace ∙ Privacy Policy ∙ Terms of Use ∙ Disclaimer